What we'll learn today
Building Freshworks apps that will run on two different Freshworks host products. Like, When you have published an app to Freshsales and want to publish the same to Freshworks CRM. We will step by step acknowledge that with the same codebase, we will serve the users running the app in different runtime environments of the host Freshworks product.
Or you want to build a single app and publish to both the products since the functionality of these products are similar.
Freshsales and Freshworks CRM are two different products. So we build our app assuming you want your app to have one build that can run with both segments, which use either Freshsales or Freshworks CRM.
What we'll need
- A modern web browser like Google Chrome, Firefox, Edge, or Safari
- A text editor
- Freshsales and Freshworks CRM documentations
- Trail accounts of both Freshsales and Freshworks CRM. Use the assistance catalog to extend the trial further if needed.
- Freshworks CLI
- The starter code (see Setting up section)
What we'll build
A sample app and compare its every aspect to standalone Freshworks App.
- Building configuration page using
iparams.json - Building configuration page using
iparams.html - Using Data Methods
- Declaring serverless events in the manifest
Prerequisites
- You created a couple of Freshworks Apps beforehand. If not, read the introductory guide.
- You already know a couple of platform capabilities.
Get the starter code ready
git clone https://github.com/freshworks-developers/omnify-freshworks-apps.git
Alternatively,
Verify
- Open the cloned repository in the code editor.
- Open Terminal/Command prompt and run the following command
fdk run - You should notice CLI starts a simulated server at http://*:10001/
- Login to Freshsales trial account and pay attention to four placeholders after appending ?dev=true at every page. You should see an app icon available to activate the app.
- Login to Freshworks CRM trial account and pay attention to four placeholders after appending ?dev=true at every page. You should see an app icon available to activate the app except for the global navigation page.
The App that we are going to build is a sample app that demonstrates each of the Omni capabilities of the platform.
- We will start by using the starter code and build a configuration page using iparams.json. Then, we will see the dynamism involved and new functions introduced, which will help our apps load on the relevant page of either Freshsales and Freshworks CRM.
- Next, we will dive into Data Methods through which your app will know if it is in the Freshsales environment or Freshworks CRM environment.
- Finally, we will look out what changes unification will bring to serverless events. For example, callbacks can be reused or kept separated as required regarding their declared and attached.
- One more time, we will revisit the configuration page section and rebuild everything using iparams.html. However, we will spend less time here as we will simply use DOM Web APIs and Platform APIs to render the page according to the app's host Freshworks product.
Let's create a config/ directory. Then, in the same directory, create the iparams.json file.
In the iparams.json file, write the configuration as follows,
{
  "api_key": {
    "display_name": "ApiKey",
    "description": "Please enter your API Key",
    "type": "api_key",
    "required": true,
    "type_attributes": {
      "product": "current"
    },
    "secure": true
  },
  "freshworks_crm_field": {
    "display_name": "A field on Freshworks CRM",
    "description": "An example description of field in Freshworks CRM",
    "type": "text",
    "required": true
  },
  "freshsales_field": {
    "display_name": "A field on Freshsales",
    "description": "An example description of field in Freshsales",
    "type": "text",
    "required": true
  }
}
- We define the properties for both Freshsales and Freshworks CRM
- We will try to hide the Freshworks CRM if the host product is Freshsales and Vice versa.
- The API Key field exists because it will be a required field for the app to function. So we need it in both the Freshworks products.
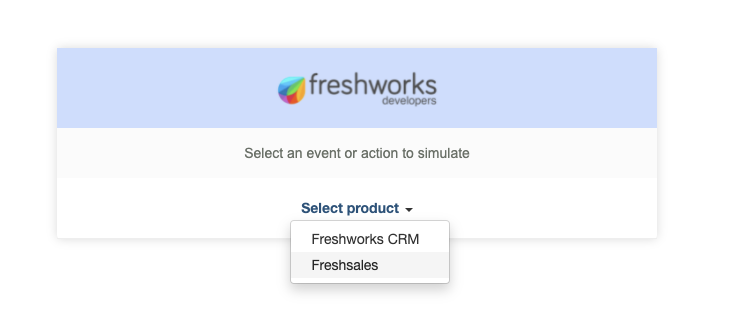
- If you go ahead and open the local simulation page at - http://localhost:10001/custom_configs, a product switcher page appears.
- Freshworks CLI understands that you are building an Omni app.
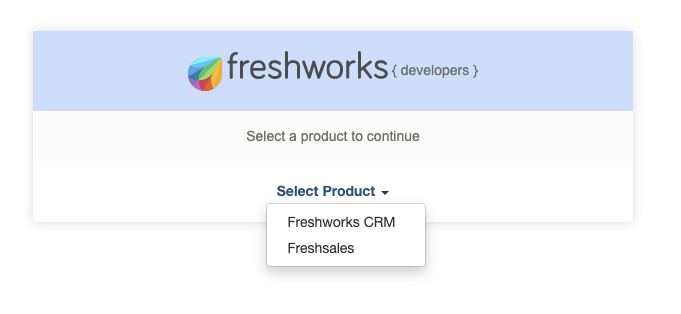
If you choose to simulate either of the products, you will see the same configuration page rendered as follows.
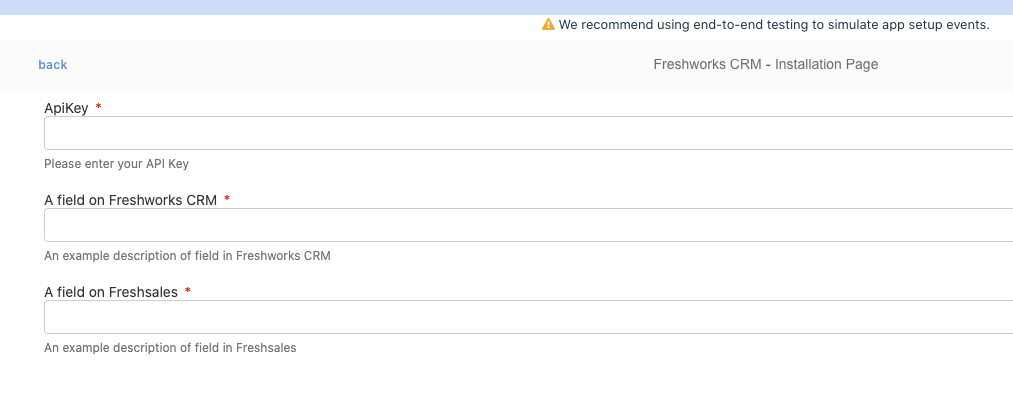
- For example, by selecting Freshworks CRM, the following page will appear.
- You can notice that the platform renders an installation parameter related to Freshsales as one of the fields which is not the desired field to render in Freshworks CRM's context.
We will have to tell the platform to render the right page based on the host Freshworks product. To do it, lets go ahead and create another directory within config/folder and name it assets/
Create iparams.js file within assets/ directory
Start writing the following Javascript code,
async function onFormLoad() {
  window.client = await app.initialized();
  let { name: currentProduct } = client.context.productContext;
  renderConfigPage(currentProduct);
}

function renderConfigPage(currentProduct) {
  let product = String(currentProduct);

  switch (product) {
    case 'freshsales':
      utils.set('api_key', personalizeAPIField('Freshsales'));
      utils.set('freshworks_crm_field', { visible: false });
      break;
    case 'freshworks_crm':
      utils.set('api_key', personalizeAPIField('Freshworks CRM'));
      utils.set('freshsales_field', { visible: false });
      break;
  }

  function personalizeAPIField(name) {
    return {
      hint: `Please enter API key of ${name}`,
      label: `${name} API key`
    };
  }
}

async function establishAPIConnection(api_key) {
  try {
    let { name: productName, url: host_url } = client.context.productContext;
    let options = {
      headers: {
        Authorization: `Token token=${api_key}`,
        'Content-Type': 'application/json'
      }
    };
    let URL = genHostEndpoint(productName, host_url);
    let res = await client.request.get(URL, options);
    if (res.status == '200') return '';
  } catch (error) {
    console.error(error);
    return `Invalid API Key`;
  }

  function genHostEndpoint(productName, host_url) {
    switch (productName) {
      case 'freshsales':
        return `${host_url}/api/settings/deals/fields`;
      case 'freshworks_crm':
        return `${host_url}/api/sales_activites`;
    }
  }
}

function onFormUnload() {
  console.log('This statement executes when user leaves the configuration page');
}
On API key insert
- Before we talk about what this Javascript is doing, we will first go back to
iparams.jsonand add one more property to theapi_keyinstallation parameter. That is"events": [{ "change": "establishAPIConnection" }] - The
"events": [{ "change": "establishAPIConnection" }]property observes if the API key is entered by the user. When the user enters the API key, we will validate with relevant host product Freshworks product APIs if the API key is valid.
Omni features
The onFormLoad() and onFormUnload() are two functions that the platform invokes when the app loads or unloads the configuration page
client.context.productContext is a property that will return an object with two properties - url and name
For Freshsales
{
  "url": "https://subdomain.freshales.io",
  "name": "freshsales"
}
For Freshworks CRM
{
  "url": "https://sample.myfreshworks.com/crm",
  "name": "freshworks_crm"
}
This is how depending on the product name, utils.set(..,{visible:false}) will hide a non-relevant field. For example, if the configuration page renders on Freshsales, Platform will hide the field for Freshworks CRM and vice versa.
Note:
- If you want to learn more about how iparams.js runs hand in hand with iparams.json, learn about dynamic installation pages.
- Learn about configuration pages on the Freshworks developer platform if you have more questions on this topic.
Now that we understand how the app renders configuration pages based on the host Freshworks product, we will explore how to let the app's front-end know the host Freshworks product.
We will focus on the app/ directory to render client.data.get('domainName') return value to the app's UI in every placeholder.
Polishing the user interface
The UI that renders in the specified placeholders of the Omni uses the HTML, CSS, and JS files from the app/ directory. So let us write the code to make changes as needed,
Index.html
Open the index.html file and remove all the existing code which comes with a template using fdk create and write the following code
<html>
  <head>
    <script src="https://static.freshdev.io/fdk/2.0/assets/fresh_client.js"></script>
    <script type="module" src="https://unpkg.com/@freshworks/crayons/dist/crayons/crayons.esm.js"></script>
    <script nomodule src="https://unpkg.com/@freshworks/crayons/dist/crayons/crayons.js"></script>
    <link rel="stylesheet" href="styles/styles.css" />
  </head>

  <body>
    <article>
      <section>
        <h1>Data Method Demonstration</h1>
        <p>Here is the what Data Method of Domain responded with</p>
        <code>
          <p id="result"></p>
        </code>
      </section>

      <section></section>
    </article>
  </body>
  <script defer src="scripts/app.js"></script>
</html>
- Relevant styles and crayons library is included. This HTML file is links to
scripts/app.js - Notice the
element with id attribute values result. We will render the value that Data Method responds with at the part. - The idea is to notice both Freshsales and Freshworks CRM will return correct data based on the host Freshworks product.
Likewise app/styles/styles.css
html {
  box-sizing: border-box;
}

*,
*::before,
*::after {
  box-sizing: inherit;
}

article {
  display: flex;
  flex-flow: row wrap;
  justify-content: space-around;
  align-items: stretch;
}

section {
  width: 45%;
  height: 35%;
}

h1 {
  font-size: 20px;
}
Nothing special. We simply use flexbox to position the elements in a user-friendly manner. You can choose to remove the views/modal.html that come with template code at this point.
app/scripts/app.js
Let's have app.js to let the app know the context of its host Freshworks product.
Remove any existing code and write the following,
(async function init() {
  let client = await app.initialized();
  client.events.on('app.activated', async function getData() {
    let data = await client.data.get('domainName');
    writeToDOM(data);
  });
})();

function writeToDOM(data) {
  const renderUIwith = document.querySelector('#result');
  const domainNameElement = `
    <p>
    ${JSON.stringify(data, null, 4)}
    </p>
  `;
  console.table(data);
  renderUIwith.insertAdjacentHTML('afterbegin', domainNameElement);
}
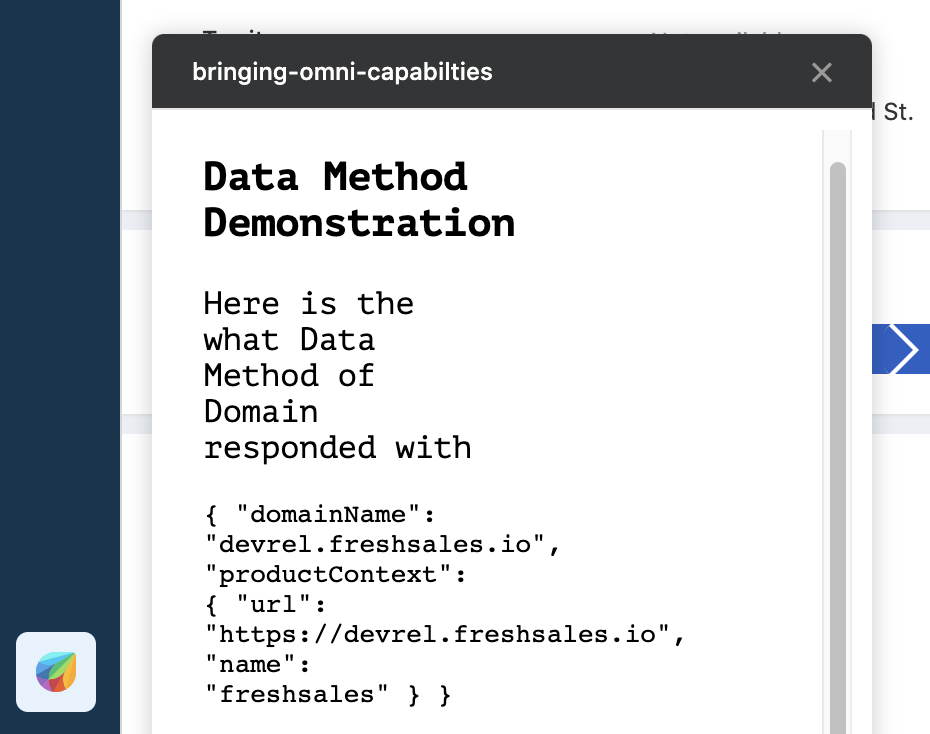
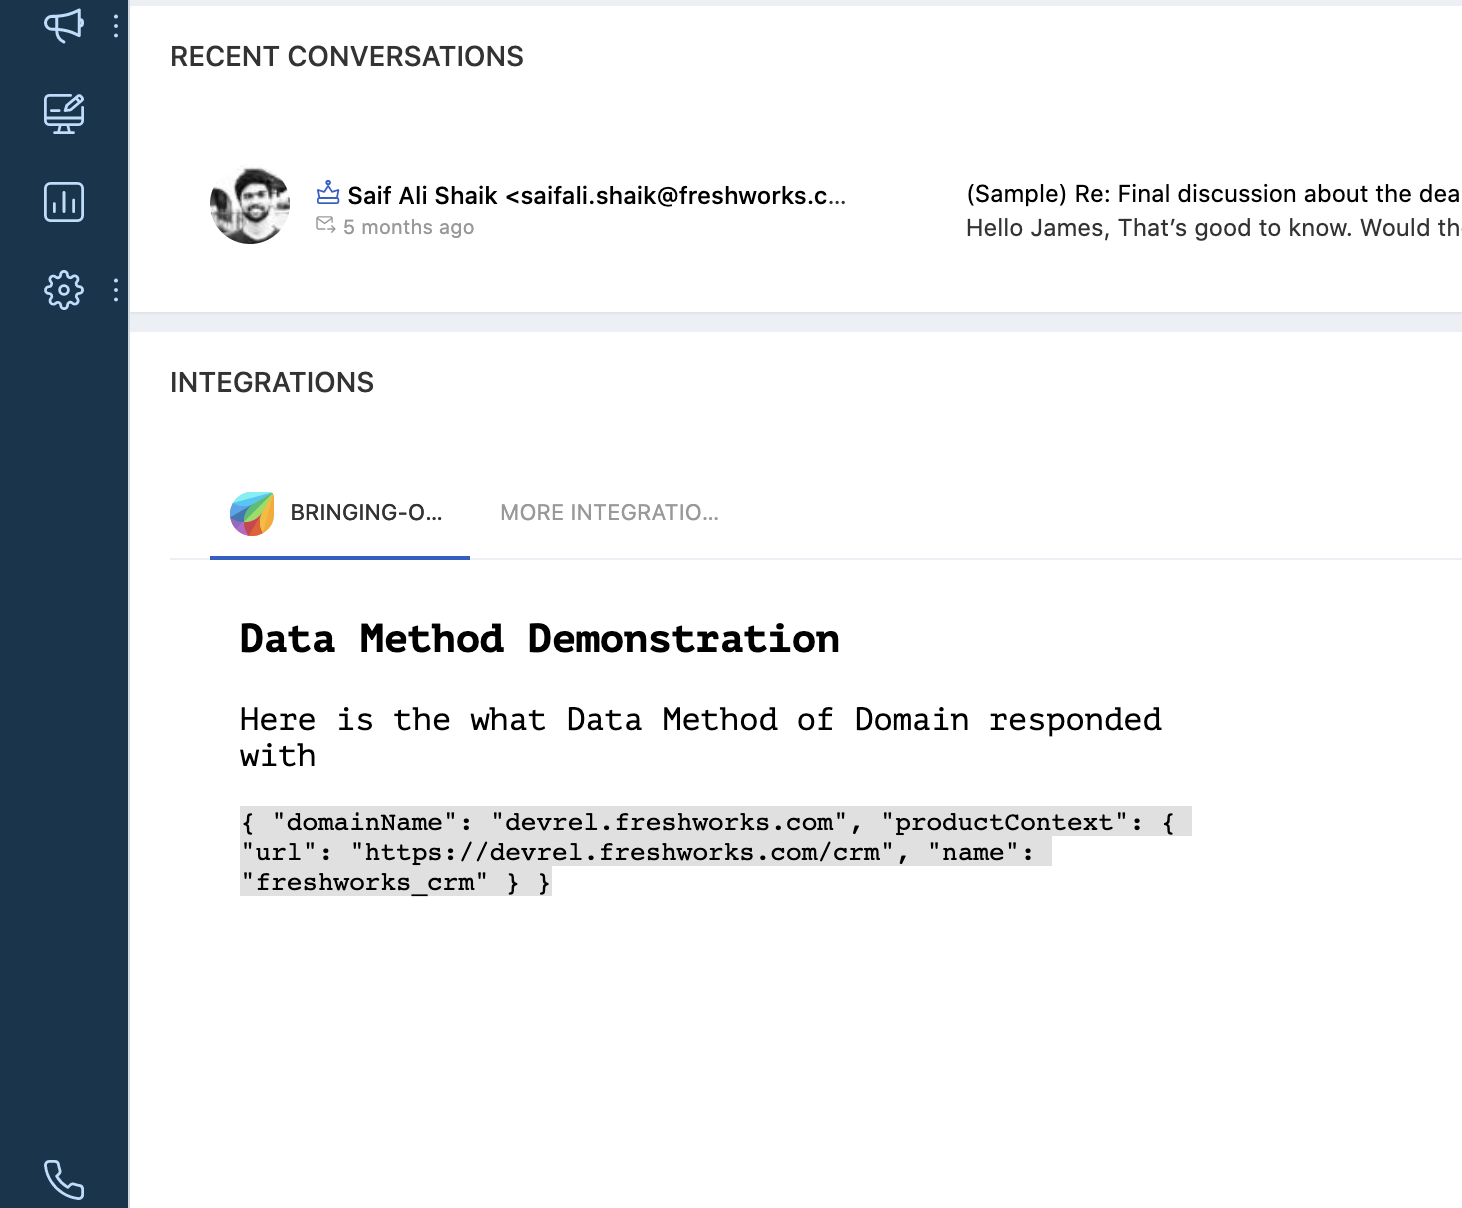
The client.data.get('domainName') resolves with following JSON data,
For Freshsales,
{
  "domainName": "subdomain.freshsales.io",
  "productContext": {
    "url": "https://subdomain.freshsales.io",
    "name": "freshsales"
  }
}
In the UI
For Freshworks CRM
{
  "domainName": "subdomain.freshworks.com",
  "productContext": {
    "url": "https://subdomain.freshworks.com/crm",
    "name": "freshworks_crm"
  }
}
In the UI,
Freshworks platform gives the developers capabilities to help the app observe and act when certain events occur in the host Freshworks product.
Usually, you will be required to declare it in the server.js as follows:
exports = {
  events: [{ event: 'eventName', callback: 'eventCallbackMethod' }],
  eventCallbackMethod: function (payload) {
    //Multiple events can access the same callback
    console.log('Logging arguments from the event: ' + JSON.stringify(payload));
  }
};
With platform version 2.1, you can declare all the events in the manifest file. In this section, we will explore how to do it.
manifest.json
Go back to the manifest.json and rewrite it as follows:
{
  "platform-version": "2.1",
  "product": {
    "freshworks_crm": {
      "location": {
        "deal_entity_menu": {
          "url": "index.html",
          "icon": "styles/images/icon.svg"
        },
        "sales_account_entity_menu": {
          "url": "index.html",
          "icon": "styles/images/icon.svg"
        },
        "contact_entity_menu": {
          "url": "index.html",
          "icon": "styles/images/icon.svg"
        }
      },
      "events": {
        "onContactCreate": {
          "handler": "onContactCreateHandler"
        },
        "onDealCreate": {
          "handler": "onDealCreateHandler"
        },
        "onExternalEvent": {
          "handler": "handleExtEventForCRM"
        }
      }
    },
    "freshsales": {
      "location": {
        "left_nav_chat": {
          "url": "index.html",
          "icon": "styles/images/icon.svg"
        },
        "left_nav_cti": {
          "url": "index.html",
          "icon": "styles/images/icon.svg"
        },
        "deal_entity_menu": {
          "url": "index.html",
          "icon": "styles/images/icon.svg"
        },
        "sales_account_entity_menu": {
          "url": "index.html",
          "icon": "styles/images/icon.svg"
        }
      },
      "events": {
        "onLeadCreate": {
          "handler": "onLeadCreateHandler"
        },
        "onDealCreate": {
          "handler": "onDealCreateHandler"
        },
        "onExternalEvent": {
          "handler": "handleExtEventForSales"
        }
      }
    }
  },
  "whitelisted-domains": ["https://*.freshsales.io", "https://*.freshworks.com", "https://*.myfreshworks.com"]
}
- Notice the new events key within each product value.
- The event names are keys of events object properties. So, for example, you can see
onContactCreateis a key. - The handler is attached to the event as a value of its event name property's value.
- Notice the
whitelisted-domainsproperty on themanifest.json. Freshworks CRM requires adding bothhttps://subdomain.freshworks.comandhttps://subdomain.myfreshworks.comto the allow list. Two domains because users who will use the app might have either of the domains.
server.js
Till now, we haven't created any server files. So let's go ahead and create one.
Create server/ dir with server.js in it.
Write the following code in server.js
function logMsg(msg, payload) {
  let {
    productContext: { name: productName }
  } = payload;
  let log = console.info;

  log(`
  \nProduct: ${productName}
  \nWhen: ${msg}
  \nPayload: ${JSON.stringify(payload, ['domain', 'event'], 2)}
  `);
}

exports = {
  onLeadCreateHandler: function freshsales(payload) {
    logMsg('A lead is created in Freshsales', payload);
  },
  onContactCreateHandler: function freshworks_crm(payload) {
    logMsg('A contact is created in Freshworks CRM', payload);
  },
  onDealCreateHandler: function common(payload) {
    logMsg('A Deal is created either in Freshsales or in Freshworks CRM', payload);
  },
  handleExtEventForSales: function (payload) {
    logMsg('A desired external event occurs for Freshsales', payload);
  },
  handleExtEventForCRM: function (payload) {
    logMsg('A desired external event occurs for Freshworks CRM', payload);
  }
};
- The developer platform expects the exports object to contain the key-value pairs where keys are handler names declared in the manifest.json. However, the values are simply methods that developers can define.
- See
onLeadCreateHandlerandonContactCreateHandler. Both of them invoke the methods when respective events occur in Freshsales and Freshworks CRM, respectively. - Product-wise, Freshworks CRM is an evolution of Freshsales, so both of them have
onDealCreateserverless events. Therefore, you can define the same method in such cases, although either host Freshworks product triggers the event. handleExtEventForSalesandhandleExtEventForCRMhave two different methods.
Properties within exports object simply log messages to the console.
The logMsg(..) function simply logs the data to the console. Notably, the payload that passed will have the same productContext property(same as in Data Method) that is helpful for the app to understand if the payload is coming from Freshsales or Freshworks CRM.
Let's simulate one of the events.
fdk run
You will find the following simulation page running on the localhost
To simulate product, app setup, and external events, visit - `http://localhost:10001/web/test`
To test the installation page, visit - `http://localhost:10001/custom_configs`
We want to simulate product, app setup, and external events,
As soon as you open http://localhost:10001/web/test, you will get to see a product switcher
This product switcher will help you simulate the event in whichever product you want to simulate the events locally. For example, if I choose Freshworks CRM,
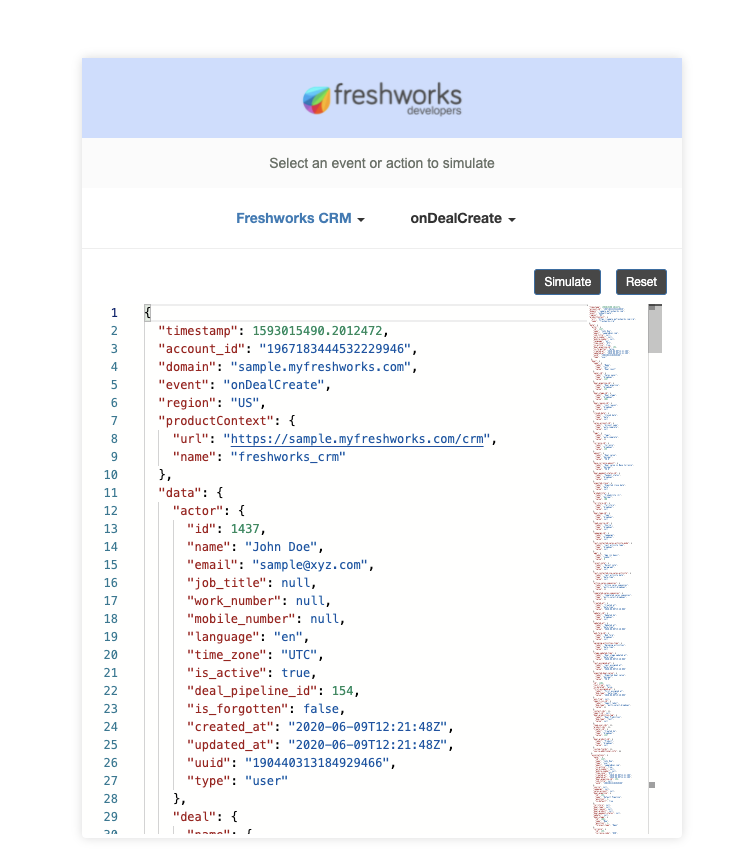
You get a drop-down of events you want to simulate along with the sample payload generated to test your application.
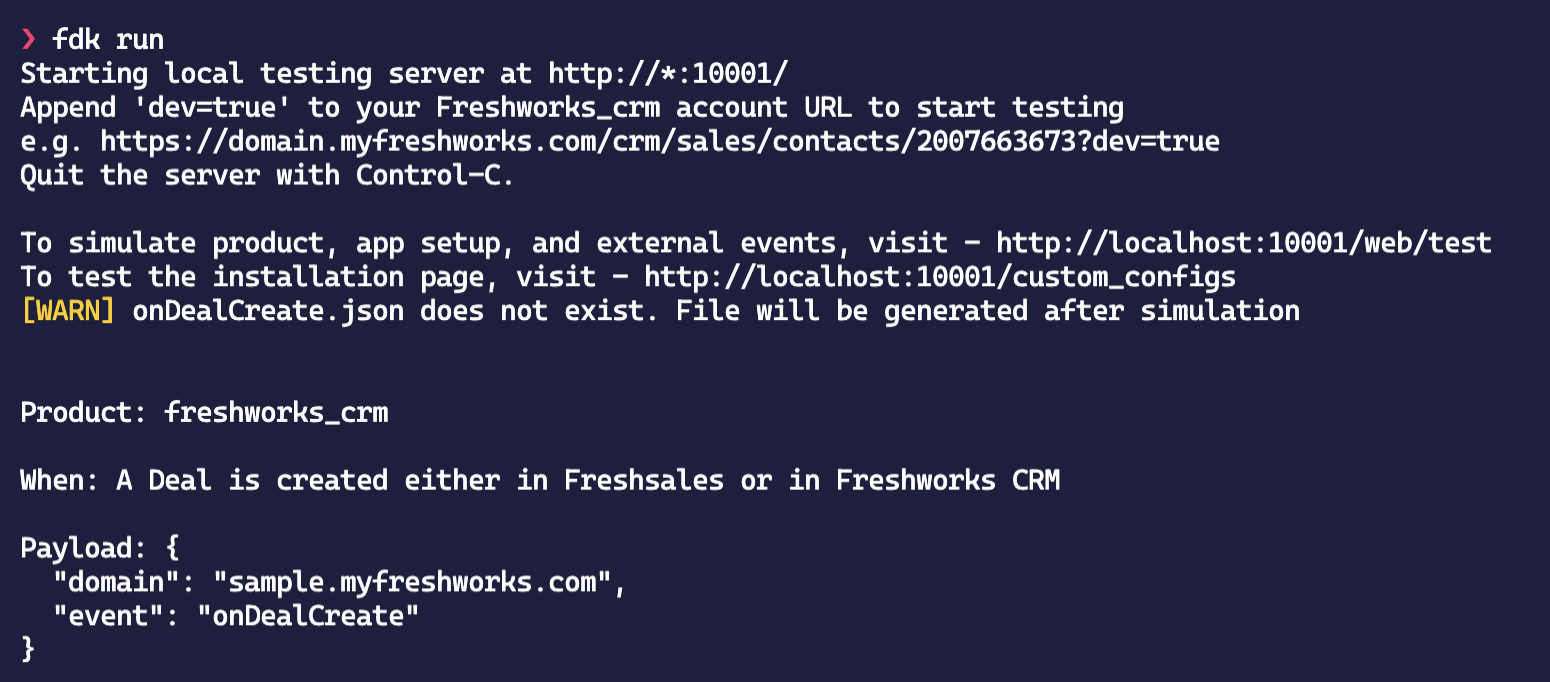
Above is a screenshot of the log to the console when simulated onDealCreate serverless event.
We've built the complete app we intended to create.
Freshworks lets developers build the configuration pages for their app using iparams.json if their use cases require more levels of customization.
In those cases how do we handle this omnification?
You can render the configuration page as soon as HTML loads the assets/iparams.js included.
Following is a sample iparams.js code
(async function () {
  const client = await app.initialized();
  let { name: productName } = client.context.productContext;
  renderConfigPage(productName);
})();

function renderConfigPage(productName) {
  const titleHTML = document.querySelector('header.product-specific.title');
  const subTitleHTML = document.querySelector('legend.product-specific.subtitle');

  titleHTML.innerHTML = `Omni - Custom configuration page <span> ${productName}</span> 🌍`;
  subTitleHTML.innerHTML = `${productName} Specific Elements Implementation`;
}
- Notice that we are simply changing the HTML Elements based on the product.
- We can know which product the app is loading based on the
productContextobject.
We have looked at all the distinct parts of what platform version 2.1 brings to help you omnify your Freshworks apps.
Note: We approached this tutorial from the lens of Freshsales and Freshworks CRM to be two separate products. Freshsales has halted new registrations. All new users will automatically register with Freshworks CRM. Existing users of Freshsales will continue to use Freshsales.
At the current point, omnifying Freshworks apps are only available for Freshworks CRM and Freshsales. Please feel free to raise a feedback topic on the forum.
All the concepts learned,
- Configuration pages using
iparams.jsonandiparams.html - Data Methods returning
productContext - Routing serverless events using
manifest.json - Simulating serverless events for Omni-apps
It will be relevant for any host Freshworks product in the future.
See the final source code of the app.
Kudos for completing the tutorial! Until next time!