Learning to build a Freshworks App is fun. As a developer, you can bring more flexibility to the product as Freshworks apps act like extensions that help businesses customize the product to suit their needs.
With apps, you can modify the functionality, alter the behavior, automate actions, and even hide a few product features. Moreover, this is just the tip of the iceberg, there's a lot more you can do by building apps.
What you'll learn
- How to create a Freshworks app from scratch
- The basic structure of the Freshworks app
- A few FDK commands help you build and run the app.
Note: This tutorial is based on the platform version 2.3 and Freshworks CLI (FDK) version 9 and above. For the previous version of the platform and FDK support, move over to the older tutorial [LINK].
What you'll need
- A Freshdesk trial account
- One of the modern web browsers amongst Google Chrome, Firefox, Edge, and Safari. This tutorial uses Chrome.
- Install the latest Freshworks CLI (FDK).
- A code editor like Visual studio code, Sublime, etc.
- Working knowledge of HTML, CSS, JavaScript, and Browser dev tools.
What you'll build
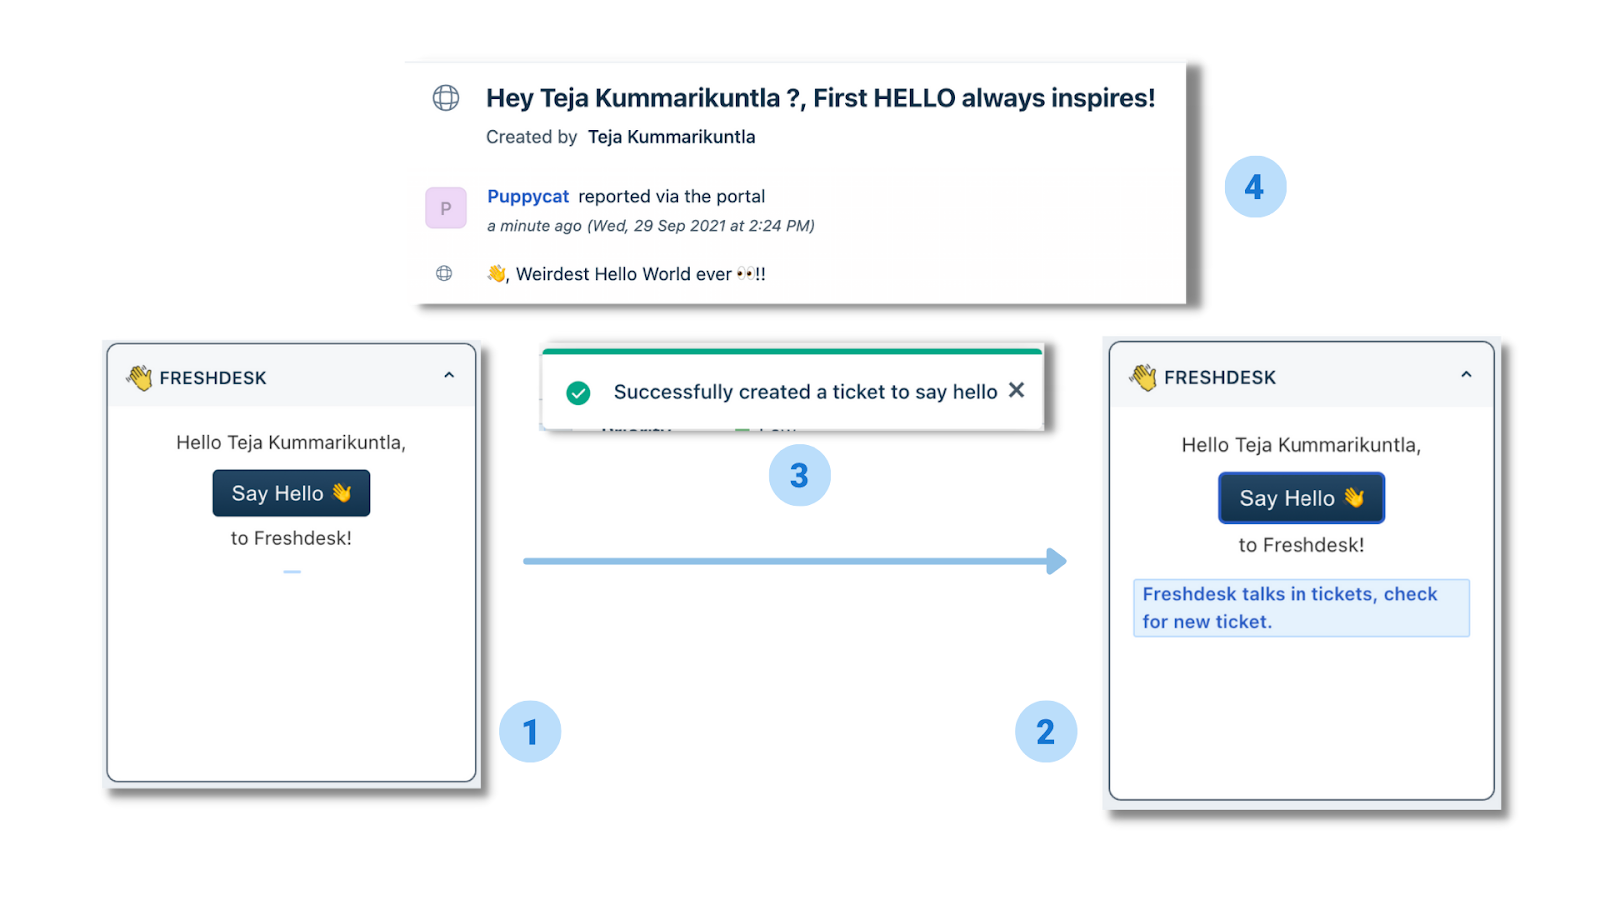
You're going to develop an app that runs in the ticket sidebar. When a user clicks on the Say Hello Button, the app shows a notification and creates a ticket in Freshdesk.
App workflow
To give you a sneak peek, we'll cover
- The usage of fdk create command
- The front-end development of the application
- The use of the Ticket API to create a ticket in Freshdesk
- The use of the Interface Method to present notifications
- The implementation of Installation parameters and set values
Before we jump into the codebase, let's take a moment to extend our understanding by cloning, setting, and running the Say Hello app locally. This exercise also helps you to get a clear idea of what the app does.
And this goes into three easy steps:
Grab the API Key
Create a trial account for Freshdesk, or use your existing account to get your API key. Go to "Profile settings," then find your API key. Copy the API key to the clipboard.
Clone the project
Open up your terminal and run the command to clone the project repository.
git clone git@github.com:freshworks-developers/say-hello.git
Alternatively, you can download the project repository zip and extract it to a directory of your choice.
Run the application
Open the project folder in your code editor and get into the terminal and execute the following commands
cd Freshdesk

fdk run
You will see the CLI output as follows: 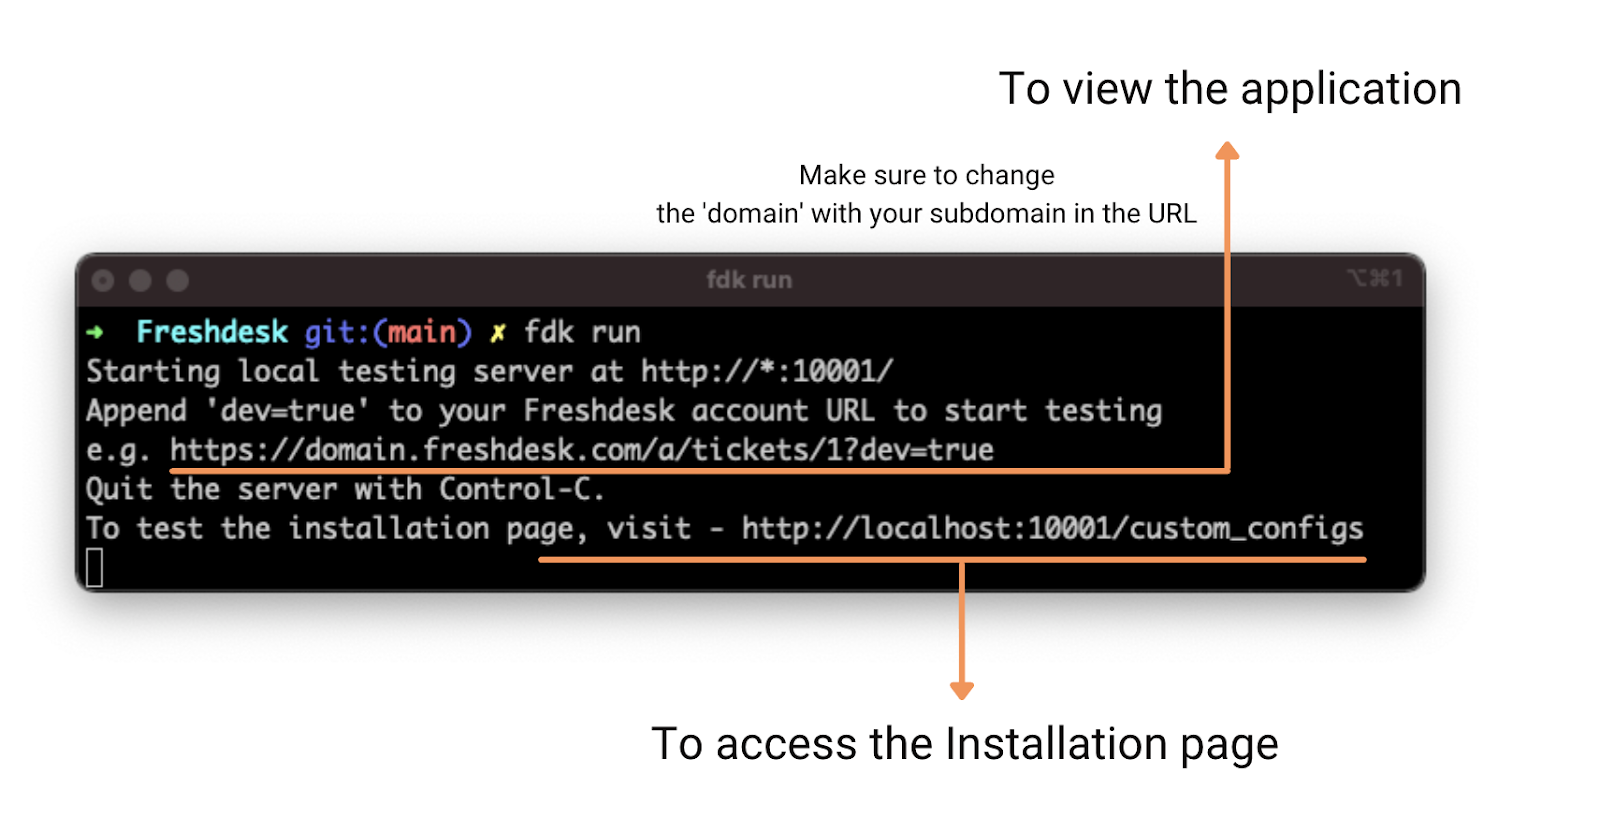
Before viewing the app, let us open the installation page running at port 10001 of the localhost.
http://localhost:10001/custom_configs
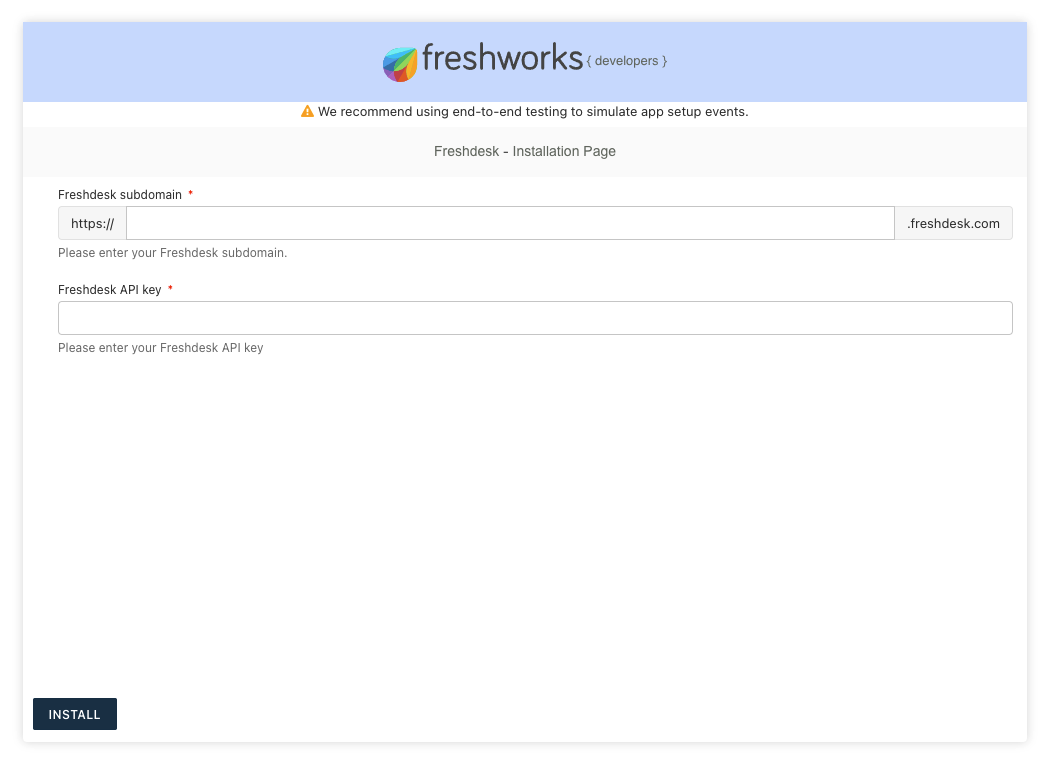
The installation page is asking for two fields.
- Freshdesk subdomain
- Freshdesk API key
For instance, If your account URL is https://puppycat.freshdesk.com, the subdomain you can provide to the Installation page is puppycat. Paste the copied API key in the Freshdesk API key field, and hit Install.
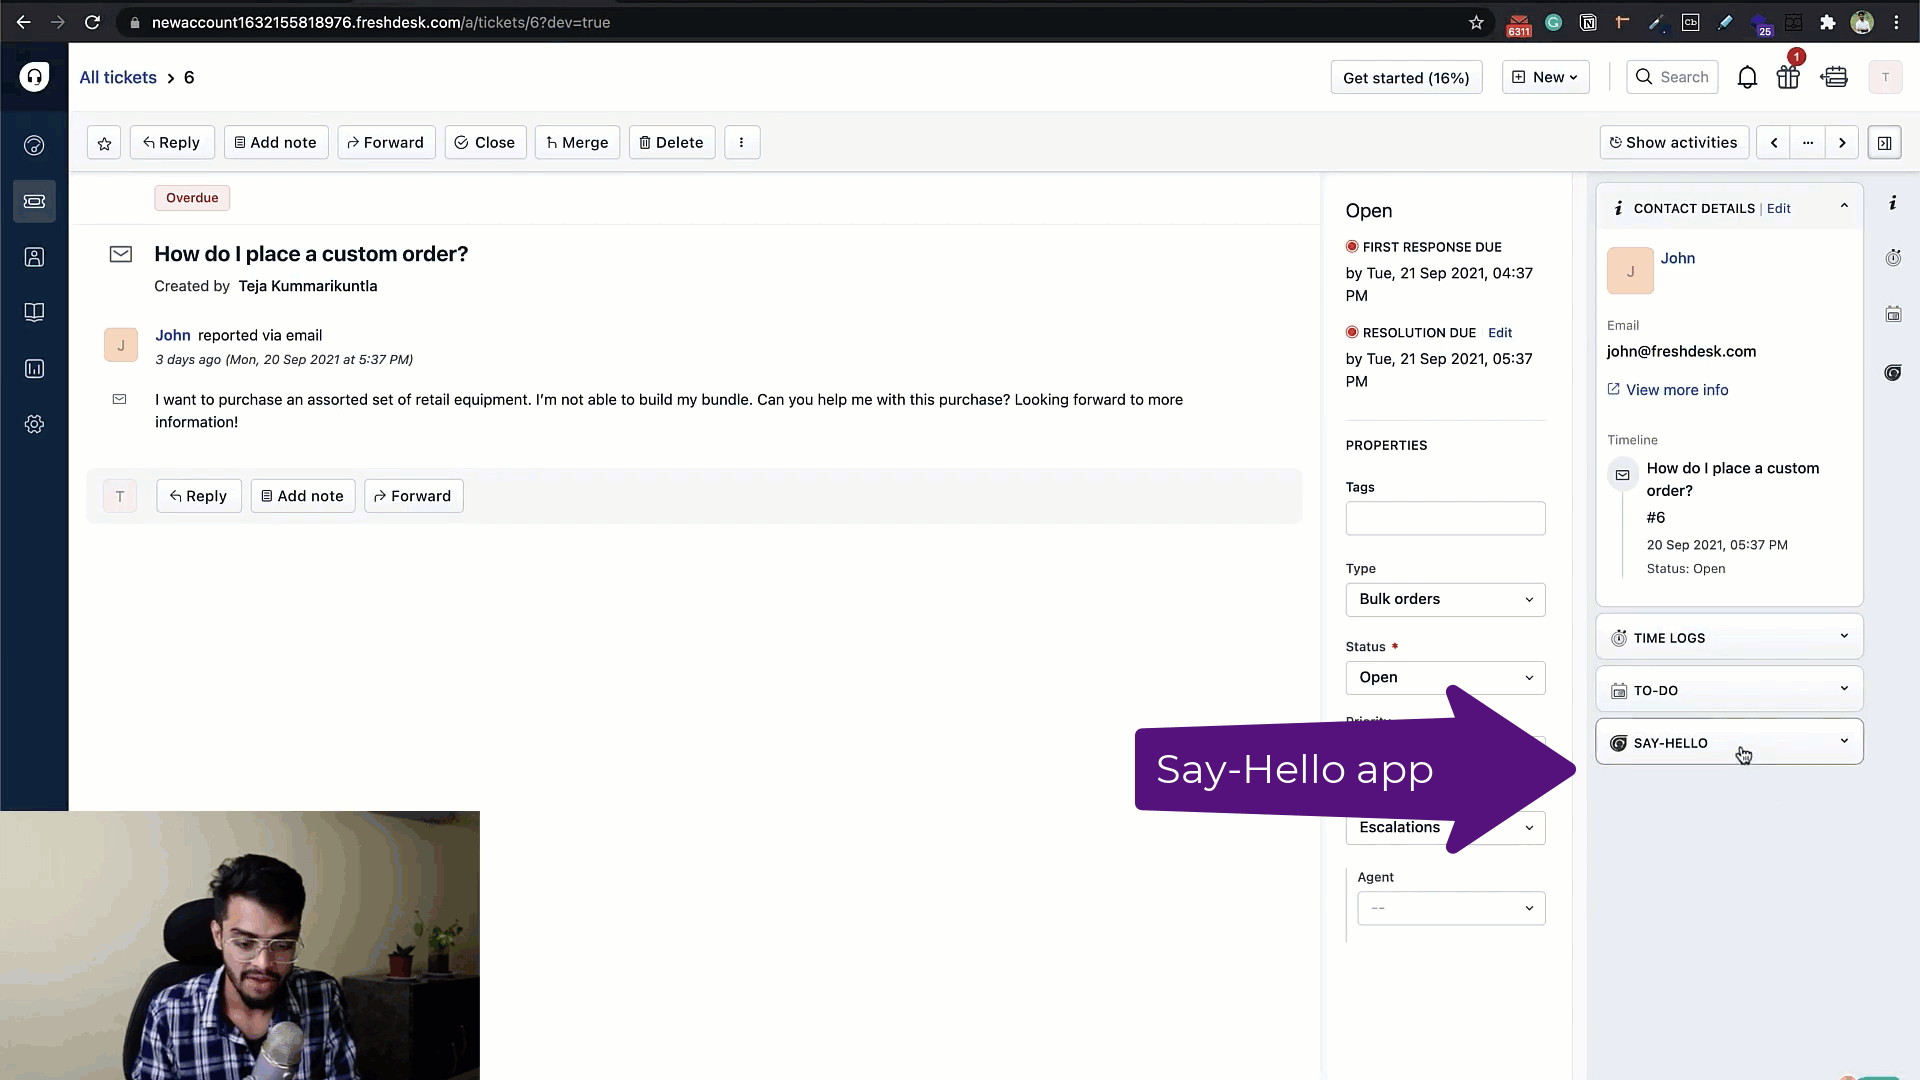
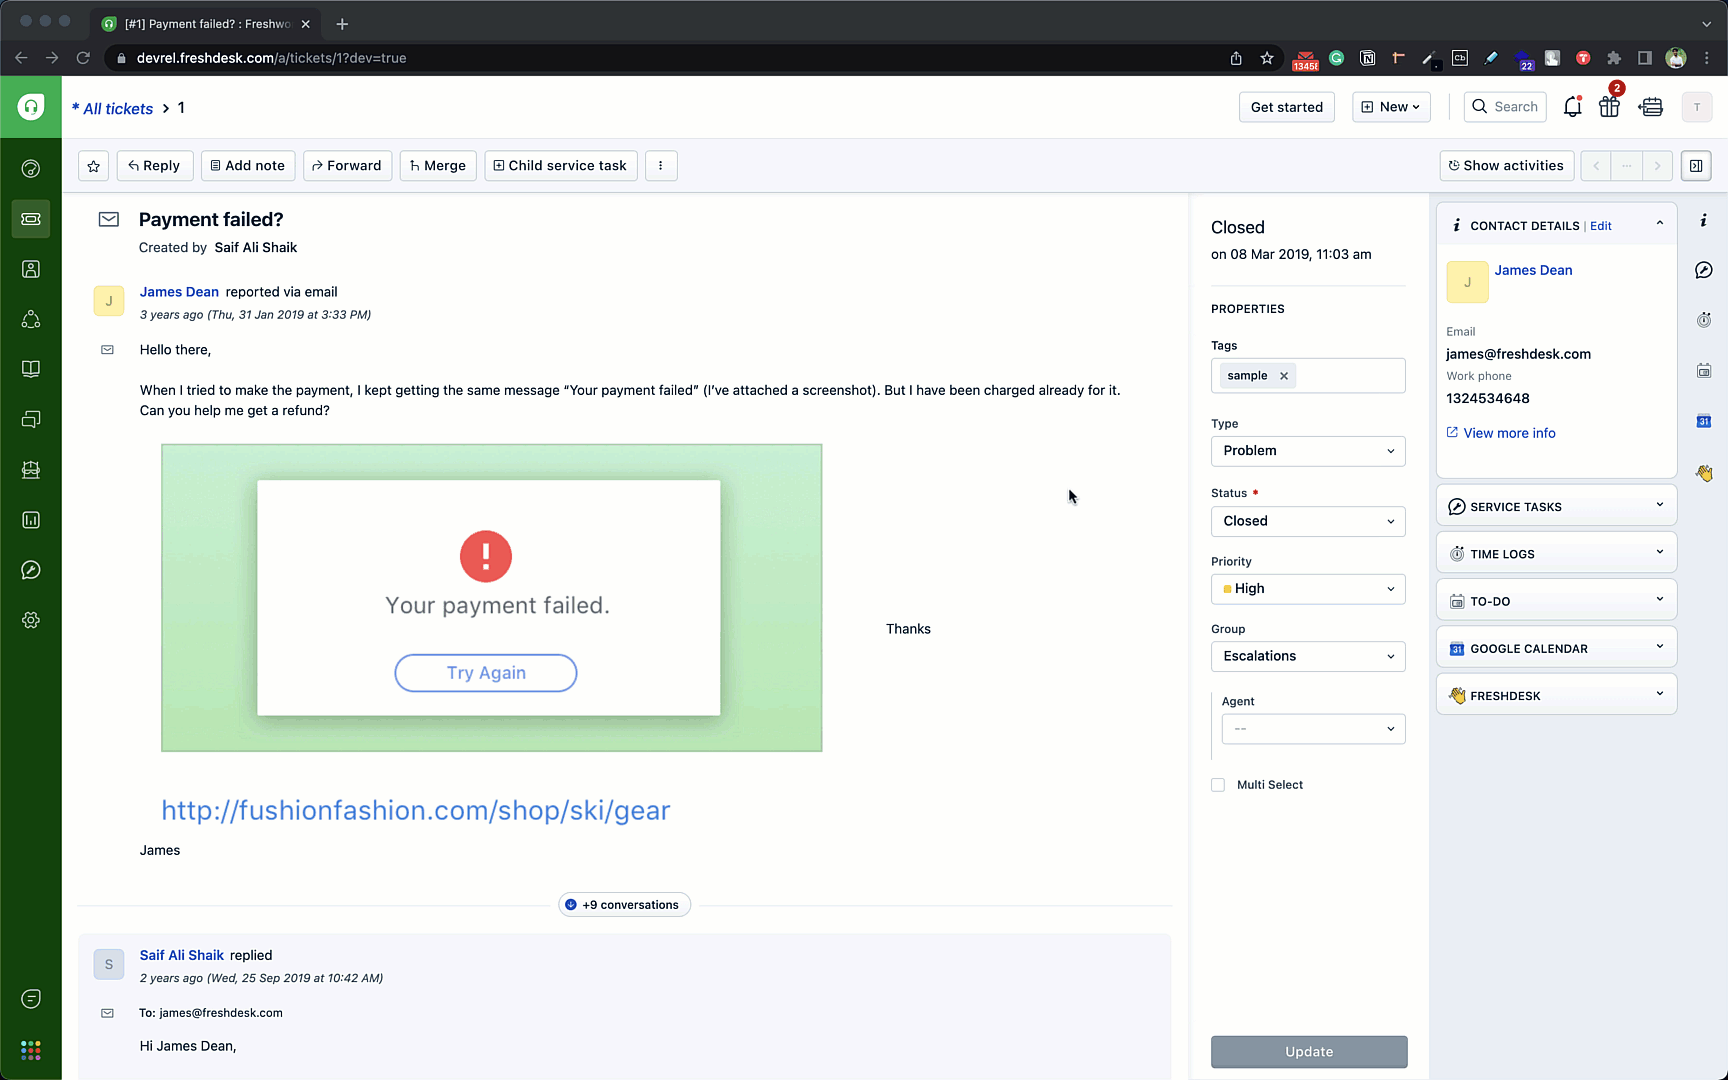
You're just a step away from viewing the Say-Hello app. In Freshdesk, click the Tickets button from the left sidebar and navigate to a ticket page. To view the app, append dev=true at the end of the URL and reload, or you can directly open it.
https://{your_subdomain}.freshdesk.com/tickets/1?dev=true
📘 Note:
If you cannot view the app, you must allow the browser to load insecure content.
- Open Freshdesk product URL (Eg.: sample.freshdesk.com)
- Click on the lock icon in the address bar in the front.
- Click on the Site settings option with a gear icon. It will redirect to Chrome's settings for this particular site.
- In the permissions listed, for Insecure content permission, mark it as Allow for this site. This provision is equivalent to usually permitting to load the unsafe scripts from the shield icon appearing in the address bar of the older browser versions.
- Refresh the page, and the browser will load the apps.
There you go; now you can find the app running at the ticket_sidebar location.
Hurray, congratulations on successfully running the application; please do not worry if you can't. You should be able to do it by the end of the tutorial.
If you observe the above GIF closely, the arrow tagged ticket_sidebar points to the location of ‘ticket_sidebar,' which is one among the locations to run the app in the Ticket Details Page https://subdomain.freshdesk.com/a/tickets/XX (Where XX is the number when the user selects any tickets on the list). Learn more about placeholders in the documentation.
You've successfully experienced how Freshworks Developers run their app in local development. In the next step of this tutorial, we will look into how you create an app.
Great! Now that you know what the Say-Hello app does, getting your hands on creating it from scratch will give you more clarity on how it works.
FDK provides a command to create apps from templates. We shall use that to avoid writing boilerplate code.
Open the terminal window, navigate to the directory you want to create your app and type the following command. Note that this directory must be empty.
fdk create –-products freshdesk --template your_first_app
Alternatively, you can just run fdk create and use the CLI prompts to choose the product as "Freshdesk and then the template as your_first_app. Why don't you give this a try?
The command creates the template app with directories and files.
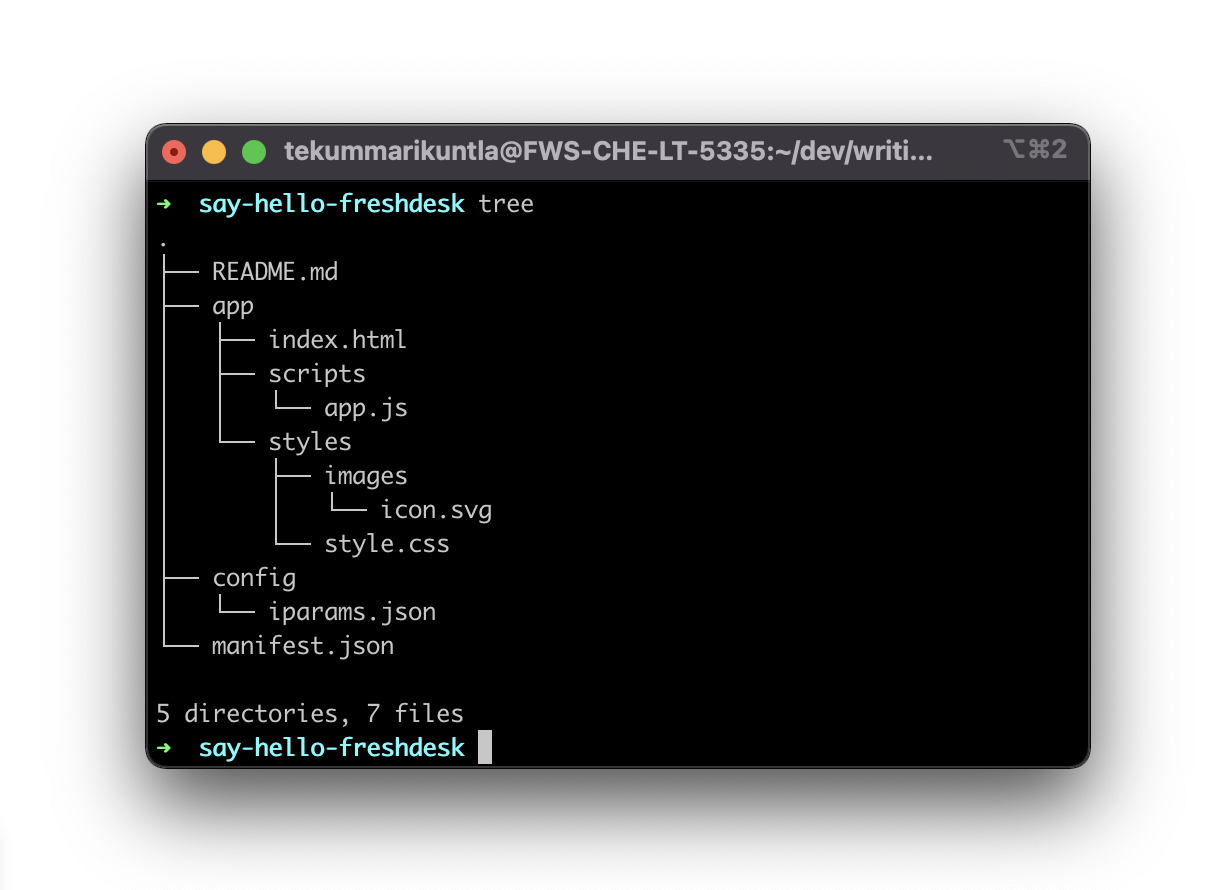
To closely examine the project and the code walkthrough of this app, please read the your-first-app documentation, and you should be able to understand various files and their usage.
🏓 Activity (optional):
Now that we created the app with the fdk create command, why not run and find out how it looks? Use the section Set-up and Demo of the App to recollect. Hint: If you wonder where to find the app in Freshdesk, you can find the app location in manifest.json.
Let us divide the development flow and build things accordingly in specific sections.
In this section, let us refactor the code base and create what content to render in the UI. We'll mostly edit app/index.html.
Add the Crayons scripts to the head section in app/index.html.
<script type="module" src="https://unpkg.com/@freshworks/crayons/dist/crayons/crayons.esm.js"></script>

<script nomodule src="https://unpkg.com/@freshworks/crayons/dist/crayons/crayons.js"></script>
Replace the body section of the script file with:
<body>
  <div class="fw-widget-wrapper">
    <span class="text-with-margin" id="agentName"></span>
    <fw-button class="text-with-margin" id="btnSayHello" color="primary"> Say Hello 👋 </fw-button>
    <p>to Freshdesk!</p>
    <fw-label class="text-with-margin" id="newTicketBanner" value="" color="blue"></fw-label>
  </div>
</body>
You should be able to find the front end of the app changes to 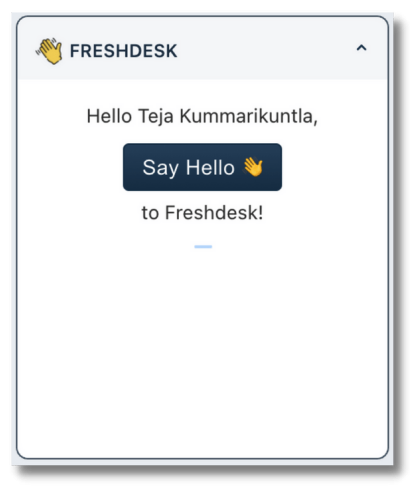
This is how your index.html should look
<html>
  <head>
    <script async src="{{{appclient}}}"></script>
    <link rel="stylesheet" type="text/css" href="styles/style.css" />
    <link rel="stylesheet" type="text/css"
      href="https://static.freshdev.io/fdk/2.0/assets/freshdesk.css" />
    <script type="module"
      src="https://unpkg.com/@freshworks/crayons@3/dist/crayons/crayons.esm.js"></script>
    <script nomodule
      src="https://unpkg.com/@freshworks/crayons@3/dist/crayons/crayons.js"></script>
  </head>

  <body>
    <div class="fw-widget-wrapper">
      <span class="text-with-margin" id="agentName"></span>
      <fw-button class="text-with-margin" id="btnSayHello" color="primary"> Say
        Hello
        👋 </fw-button>
      <p>to Freshdesk!</p>
      <fw-label class="text-with-margin" id="newTicketBanner" value="" color="blue"></fw-label>
    </div>
  </body>
  <script src="scripts/app.js"></script>
</html>
Installation Parameters
The Freshworks Developer Kit enables you to define and use parameters whose values app users can set when they install an app. These parameters are termed as installation parameters or iparams, and there exist two different ways to define or set the iparams, learn more about these configurations in the documentation
As of the project, we are performing an API call to create a ticket in which the app needs two important values it can set before making the call.
- Subdomain name
- API Key
Now we shall define the iparams.json file in a way it collects these values. From the project, navigate to the config folder, open iparams.json, and add the following JSON object.
{
   "freshdesk_subdomain": {
      "display_name": "Freshdesk subdomain",
      "description": "Please enter your Freshdesk subdomain.",
      "type": "domain",
      "type_attributes": {
         "product": "freshdesk"
      },
      "required": true
   },

   "freshdesk_api_key": {
      "display_name": "Freshdesk API key",
      "description": "Please enter your Freshdesk API key",
      "type": "api_key",
      "secure": true,
      "required": true,
      "type_attributes": {
         "product": "freshdesk"
      }
   }
}
API Requests Template
The config/requests.json file captures all the API requests in a request template schema. This template will further be used to anywhere in the app to make API requests to the mentioned endpoint with required context and request body if required.
Since in our app, we are going to make a request to Freshdesk to create a ticket, let's create a request template as follows,
{
 "createTicket": {
   "schema": {
     "method": "POST",
     "host": "<%= iparam.freshdesk_subdomain %>.freshdesk.com",
     "path": "/api/v2/tickets",
     "headers": {
       "Authorization": "Basic <%= encode(iparam.freshdesk_api_key) %>",
       "Content-Type": "application/json"
     }
   }
 }
}
Here, the installation parameter will be dynamically replaced by the platform by using the <%= iparam.freshdesk_subdomain %> iparam template in the host. The <%= encode(iparam.freshdesk_api_key) %> iparam template is similar. The platform has an encode() that encodes the given string from ASCII to Base-64 string. It will also add a random character with a colon (:) prefix if it doesn't already exist in the given string.
App Manifest
The manifest.json file contains information such as the platform version used by a product, locations on the product UI where an app can be rendered (for front-end apps), dependent files used by the app, SMI functions that can be invoked from an app's front-end component, events and the corresponding callbacks (for serverless apps), the Node.js and FDK versions used to build, test, validate, and pack the app, and the API requests using which the app can interact to any API service. This section details the various parameters of the manifest.json file. Learn more about app Manifest at the developer documentation
From the root folder, open manifest.json file and add the list of requests. As we are making API calls to Freshdesk API, let us add the Freshdesk domain to the list as follows.
{
 "product": {
   "freshdesk": {
     "requests": {
       "createTicket": {}
     },
     ...
   }
 },
 ...
}
The final manifest.json file should look like this:
{
 "platform-version": "2.3",
 "product": {
   "freshdesk": {
     "location": {
       "ticket_sidebar": {
         "url": "index.html",
         "icon": "styles/images/icon.svg"
       }
     },
     "requests": {
       "createTicket": {}
     }
   }
 },
 "engines": {
   "node": "18.14.2",
   "fdk": "9.0.0"
 }
}
When you click, "Say Hello", the app should create a ticket that wishes, and notifies the agent. In this section, we shall code the logic of the application together, and we will be working only in the app.js file inside the scripts folder (app/scripts/app.js).
We will attain this in a few steps:
- Fetch the subdomain from the installation parameters
- Make a POST request to the Tickets API endpoint to create a new ticket
- On successfully creating the Ticket, show the Notification and the Banner
- Handle the failure scenarios
To start together from the same point, open app.js file and clear the code and paste this boilerplate code which helps us to initialize the application.
function onAppActivate() {
  client.data.get("loggedInUser").then(function (data) {
    document.getElementById("agentName").textContent = `Hello ${data.loggedInUser.contact.name},`;
    document.getElementById("btnSayHello").removeEventListener("fwClick", createTicket);
    document.getElementById("btnSayHello").addEventListener("fwClick", createTicket);
  }, function (error) {
    console.error("Error: Failed to fetch loggedInUser details");
    console.error(error);
  });
}

document.onreadystatechange = function () {
  if (document.readyState === "interactive") renderApp();

  function renderApp() {
    var onInit = app.initialized();

    onInit.then(function (_client) {
      window.client = _client;
      client.events.on("app.activated", onAppActivate);
    }).catch(function (error) {
      console.error('Error: Failed to initialise the app');
      console.error(error);
    });
  }
};
Now that we have the app initialized, let me introduce you to the sayHello function.
async function sayHello(agentName) {
  try {
    // Try creating a ticket
    await createTicket(agentName);

    // If successful...
    console.info("Successfully created ticket in Freshdesk");
    showNotification("success", "Successfully created a ticket to say hello");
    showBanner("Freshdesk talks in tickets, check for new ticket.");
  } catch (error) {
    // If failed...
    console.error("Error: Failed to create a ticket");
    console.error(error);
    showNotification("danger", "Failed to create a ticket.");
  }
}
The sayHello function is the complete outline of the application logic, starting with createTicketfunction, it tries to create a ticket, and as it succeeds it logs in the browser console, and invokes ShowNotification, showBannerfunctions to indicate the same. Similarly, in any case, if it fails, the logs and notification from the catch block will help us debug. Add the sayHello function to the app.js.
For ticket creation, let us now look into the createTicket function and understand the requirements to perform an API call.
async function createTicket(agentName) {
  const ticketDetails = JSON.stringify({
    email: 'puppycat@email.com',
    subject: 'Hello',
    priority: 1,
    description: `Hey ${agentName} 👋, First HELLO always inspires!`,
    status: 2
  });
  // Send request
  await client.request.invokeTemplate("createTicket", {
    body: ticketDetails
  });
}
This is the core function that creates the Freshdesk ticket. It is a POST request to an API endpoint with the required data in the request body. So, it takes the request body in the argument.
The API to Freshdesk to create a ticket requires the following parameters in the body of the request.
- Subject
- Priority
- Description
- Status
The ticketDetails variable in the request body contains all of these information and converted into a string.
With this, the createTicket function is ready.
Finally, to help us understand the success or failure status of the application, there are two more functions as utility, they are showNotificaiton and showBanner
function showNotification(type, message) {
  return client.interface.trigger("showNotify", {
    type: type,
    message: message
  });
}

function showBanner(text) {
  document.getElementById("newTicketBanner").value = text;
}
The showNotification function uses Interface Method to present notifications, and the showBanner updates the value of a text banner component with a success message.
This is how the final app.js should look,
/**
* Show a notification toast with the given type and message
*
* @param {String} type - type of the notification
* @param {String} message - content to be shown in the notification
**/
function showNotification(type, message) {
  return client.interface.trigger("showNotify", {
    type: type,
    message: message
  });
}

/**
* Show a banner with the given text within the app
*
* @param {String} text - Text to be shown in the banner
*/
function showBanner(text) {
  document.getElementById("newTicketBanner").value = text;
}


/**
* Create a ticket to say hello
*
* @param {String} agentName - The name of the logged in agent
*/
async function createTicket(agentName) {
  const ticketDetails = JSON.stringify({
    email: 'puppycat@email.com',
    subject: 'Hello',
    priority: 1,
    description: `Hey ${agentName} 👋, First HELLO always inspires!`,
    status: 2
  });
  // Send request
  await client.request.invokeTemplate("createTicket", {
    body: ticketDetails
  });
}

/**
* To let Freshdesk say hello through ticket
*
* @param {String} agentName - The name of the logged in agent
*/
async function sayHello(agentName) {
  try {
    // Try creating a ticket
    await createTicket(agentName);

    // If successful...
    console.info("Successfully created ticket in Freshdesk");
    showNotification("success", "Successfully created a ticket to say hello");
    showBanner("Freshdesk talks in tickets, check for new ticket.");
  } catch (error) {
    // If failed...
    console.error("Error: Failed to create a ticket");
    console.error(error);
    showNotification("danger", "Failed to create a ticket.");
  }
}

function onAppActivate() {
 client.data.get("loggedInUser").then(function (data) {
  document.getElementById("agentName").textContent = `Hello ${data.loggedInUser.contact.name},`;
  document.getElementById('btnSayHello').removeEventListener('fwClick');
  document.getElementById("btnSayHello").addEventListener("fwClick", function () {
    sayHello(data.loggedInUser.contact.name);
  });
},
  function (error) {
    console.error("Error: Failed to fetch loggedInUser details");
    console.error(error);
  }
);
}

document.onreadystatechange = function () {
  if (document.readyState === 'interactive') renderApp();

  function renderApp() {
    var onInit = app.initialized();

    onInit.then(function (_client) {
      window.client = _client;
      client.events.on("app.activated", onAppActivate);
    }).catch(function (error) {
      console.error('Error: Failed to initialise the app');
      console.error(error);
    });
  }
};
Congratulations on making it so far. You're one step away from finding your app running on the screen, and it is a single-liner. 🎉
fdk run
We will test the application by running it and recollect that this is the same process we did in the Set-up and Demo of the App section.
As the above command executes, open the Installation page at http://localhost:10001/custom_configs and set the value of subdomain, API key fields. Now open any of the tickets in Freshdesk and append ?dev=true to the URL, or you can just open https://{your_domain}.freshdesk.com/a/tickets/1?dev=true.
Ta-da, you will be able to find the app running at the ticket_sidebar.
Freshworks Apps across different products are very similar with some changes, and the fact that if you're able to develop an app for one product, it is very much possible you can build apps for other products of Freshworks too.
To give you an example, take a took at the project structure of Say-Hello app for Freshdesk and Freshservice.
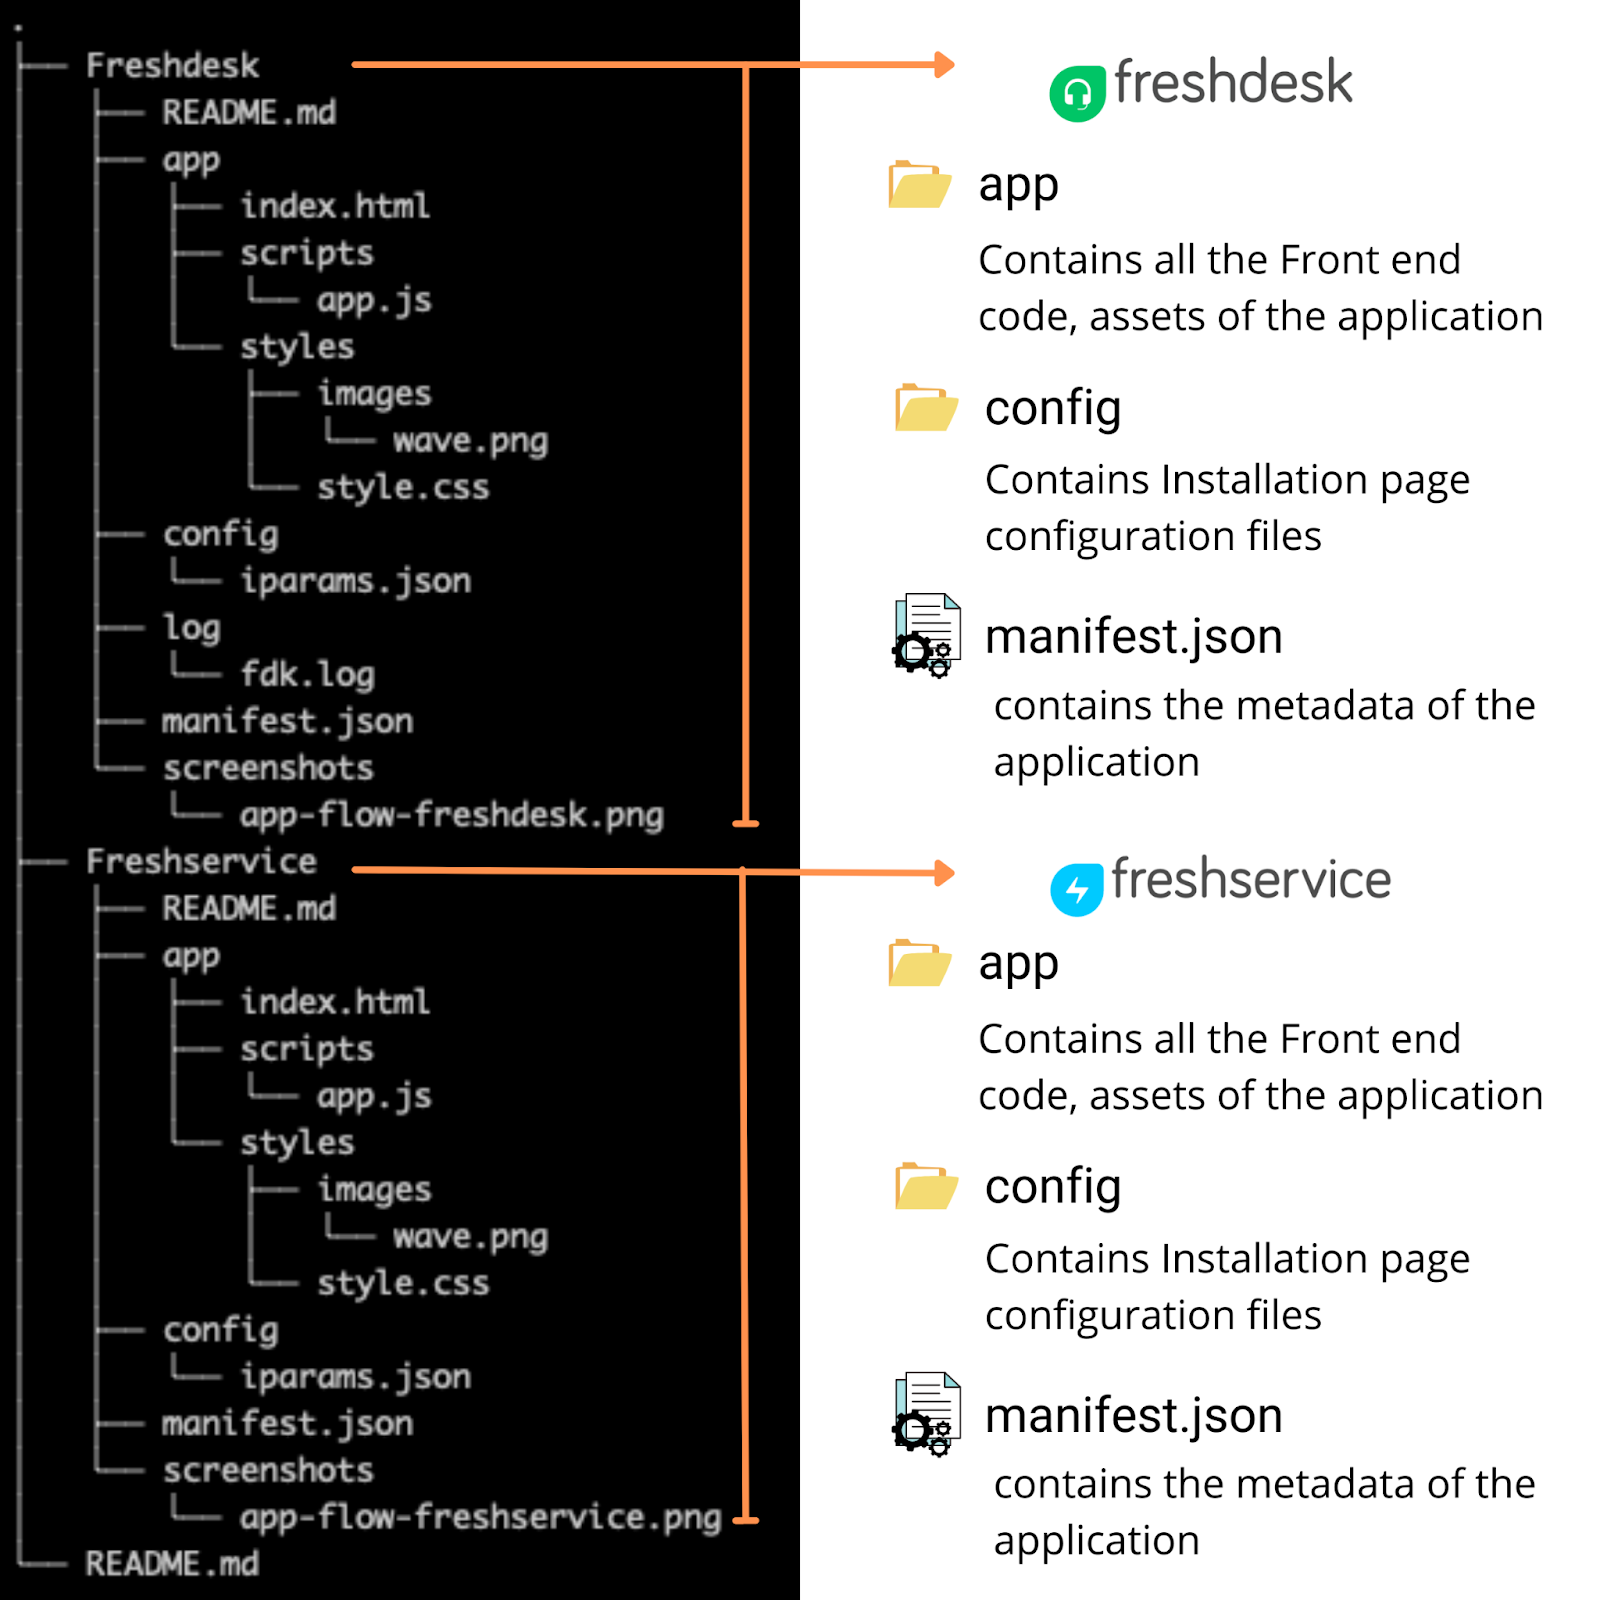
Irrespective of Freshworks products, the app structure is almost similar, except the differences come in product features, functionality, and behavior level. If you wish to try building the same app for Freshservice, jump on to the tutorial: Say-Hello for Freshservice.
⭐ As we also used Freshdesk's Interface Method to create notifications, learn more from the Introduction to Interface methods tutorial.
⭐ Refer to our Sample apps repositories demoing various platform features and capabilities.
Resources
- Be sure to check out the Introductory guide to Freshworks App Development
- Explore more tutorials at freshworks.dev/tutorials
Help
Our developer community at community.developers.freshworks.com is where you can create topics, make discussions and get a good push when you get stuck.