Freshworks developer platform now supports Vue local development natively in the Freshworks CLI through Webpack 5. This tutorial will walk you through the steps of building your first Vuejs app using the FDK from scratch.
Implementation
The FDK comes built-in with Webpack 5 and a Webpack configuration file to mount during the compilation and the build phases. The FDK detects when the project is built with Vuejs and compiles it using the Webpack with the default Webpack configuration.
Positive : Though the FDK has a default Webpack configuration for React apps, It is possible to provide custom configurations. You can follow this tutorial to create your custom Webpack config.
What are we going to build?
In this tutorial, we will build a Space station locator, a Freshworks app that runs on Freshdesk, that finds the current location of the international space station(ISS).
Prerequisites
- Familiarity with Freshworks app development.
- FDK version 6.10.0+
- Experience with Vue app development.
To create a new Vue project,
- Update the FDK to the latest version.
- Create a new folder named my_app and open the terminal/command prompt inside the newly created folder
:~$ mkdir my_app && cd my_app
- Run fdk create and select freshdesk.
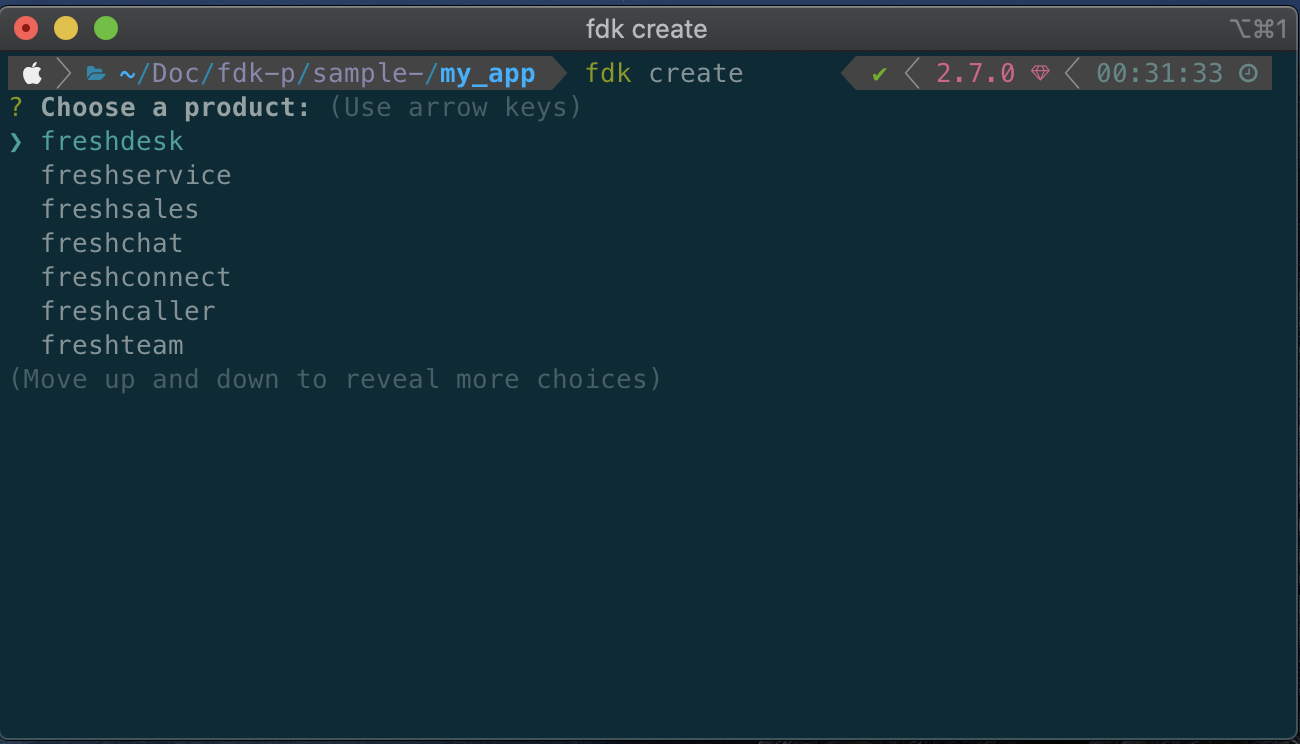
- Once you have chosen the product, select either your_first_vue_app to create your Vue app.

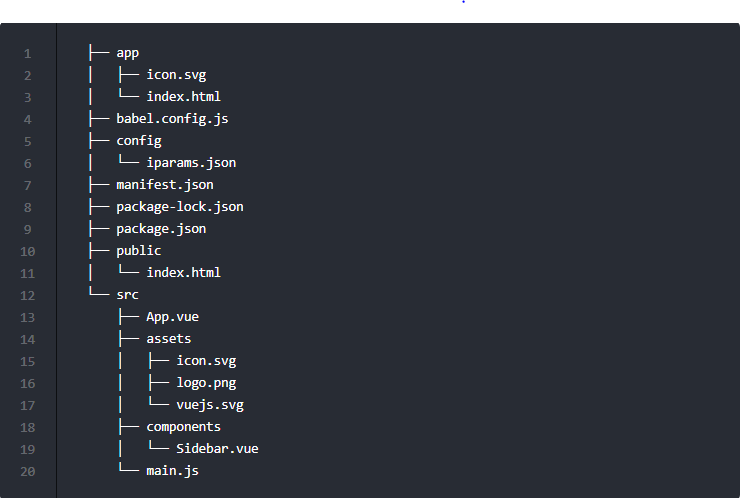
The Vue App in the Freshworks ecosystem is similar to the Vue app created using vue-cli or a Vue app bundled using the Webpack, with some minor changes in the folder structure, to support integration with the FDK.
The folder structure of the Vue app is as follows.
The manifest.json file
The manifest.json file contains the app metadata about your app, such as app locations, platform version, and other app-related information.
The package.json file
The package.json file contains information about the framework, dependencies and devDependencies used /by your app, and configurations.
The app folder
The app folder contains the built/compiled assets of the app. The FDK serves the content of the app folder in http://localhost:10001/iframe during the fdk run.
Negative : * Do not delete, replace or modify the index.html file inside the app folder. Any changes made will be overwritten during the build. If you need to add or remove anything in the app/index.html, make sure you do it in public/index.html as it serves as the template file for app/index.html.
- Replace the icon.svg file in the app folder if you choose to use a custom icon for the app. Make sure you change the name of the icon in manifest.json to the replaced/newly added image.
- If you choose to use a custom Webpack config, make sure the output always points to the app folder or subfolders.
The Config folder
The config folder contains the installation parameter of the app. WARNING Do not define your custom Webpack config inside the config folder.
The src folder
The src folder contains your Vue components and services.
src/main.js - The main.js file where the Vue app will be mounted and is the entry point to your VueJs app.
src/components/App.vue - The App.vue is the main/layout component of your Vue app. src/components/Sidebar.vue - The Sidebar.vue is the component that loads in the ticket sidebar.
Negative : In this tutorial, we will modify the src/components/Sidebar.vue to complete the app to locate the international space station.
The public folder
The public folder contains an index.html file which serves as a template to the app/index.html. Adding CSS or scripts to the app can be done in the public/index.html
Running a Vue app using the FDK is similar to running any other app,
- After creating the project, run npm install to install all the dependencies and devDependencies for your app created using.
:~/my_app$ npm install
- Once the dependencies are installed, you can run the app using the fdk run command.
:~/my_app$ fdk run
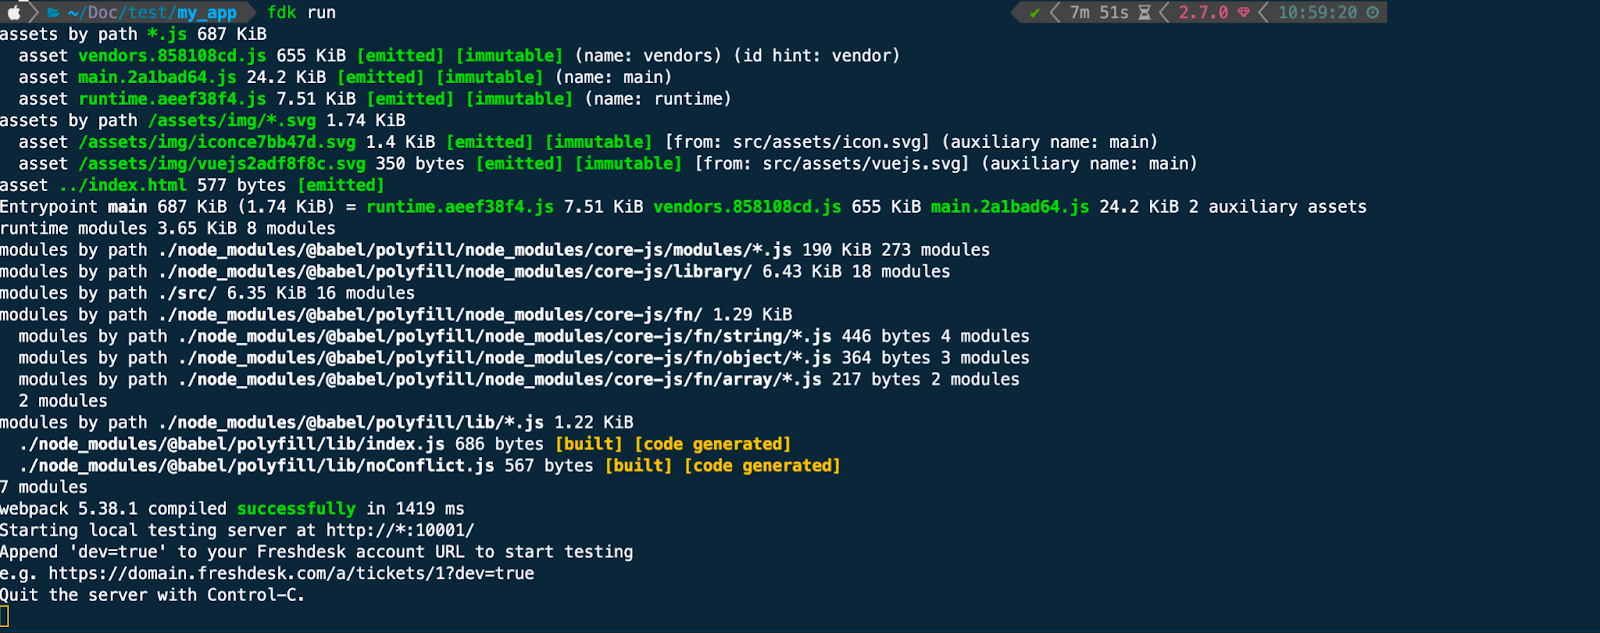
Open the ticket details page with ?dev=true once the localhost starts with the above message.
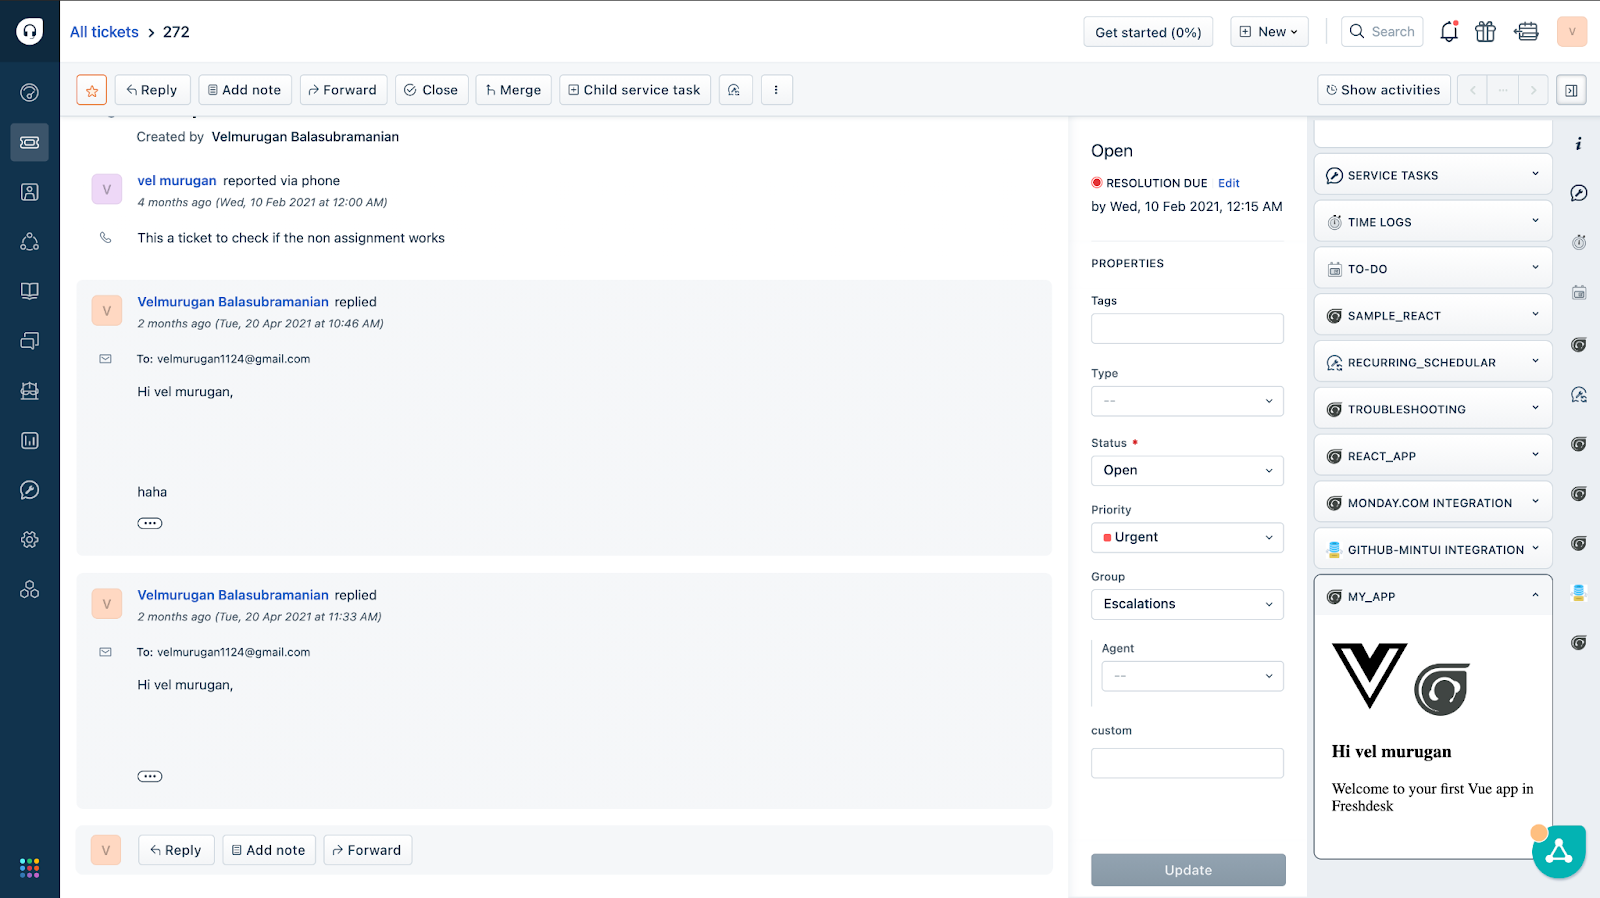
You can see the boilerplate app loaded on the ticket sidebar in the bottom right corner of the page in an Iframe from the screenshot above.
App.vue
<template >
  <div>
    <Sidebar :agentName="name" />
  </div>
</template>

<script>
import Sidebar from "./components/Sidebar.vue";

export default {
  mounted() {
    this.get();
  },
  name: "App",
  components: {
    Sidebar,
  },
  data() {
    return {
      name: "",
    };
  },
  methods: {
    get() {
      app.initialized().then((client) => {
        client.data.get("contact").then(
          (data) => {
            this.name = data.contact.name;
          },
          (error) => {
            console.error("error", error);
          }
        );
      });
    },
  },
};
</script>

<style scoped>
</style>
Sidebar.vue
<template>
  <div id="app" class="App">
    <img src="../assets/vuejs.svg" class="vue_logo" alt="logo" />
    <img src="../assets/icon.svg" class="App-logo" alt="logo" />
    <h3>Hi {{ agentName }}</h3>
    <p>Welcome to your first Vue app in Freshdesk</p>
  </div>
</template>

<script>
export default {
  name: "Sidebar",
  props: {
    agentName: String,
  },
};
</script>

<style scoped>
.vue_logo {
  height: 40vmin;
  color: red;
}
</style>
The App.vue component is the layout component in which the Freshworks app is initialized, and the client object is obtained.
In the code snippets given above, the agent name is fetched in the App.vue using the client object and passed down to the Sidebar.vue and rendered.
Now that we understand the vue app template let's get started with building the app.
As mentioned in Step 2, we will modify the src/App.vue and src/components/Sidebar.vue to complete the app to locate the international space station.
In this app, we will use the following platform features
- Request method.
- Interface method.
- Freshworks Data Storage.
About the App
- The app uses a rest API called
where the ISS at (https://api.wheretheiss.at)to fetch the current location of the International space station. - The current location is then saved to the Freshworks data storage.
- The saved data is fetched from the data storage and displayed in the window through the showNotify interface method.
We have passed the agent name to the Sidebar.vue as a prop in the template app.
Let's modify the App.vue to pass the entire client object as a prop so that we can use the client object in the child components such as Sidebar.vue
Copy the following code snippets and replace App.vue and Sidebar.vue
App.vue
<template >
  <div>
    <Sidebar :client="client" />
  </div>
</template>


<script>
import Sidebar from "./components/Sidebar.vue";
export default {
  created() {
    this.get();
  },
  name: "App",
  components: {
    Sidebar,
  },
  data() {
    return {
      client: {},
    };
  },
  methods: {
    get() {
      app.initialized().then((client) => {
        this.client = client;
      });
    },
  },
};
</script>

<style scoped>
</style>
Sidebar.vue
<template>
  <div id="app" class="App">
    <img src="../assets/vuejs.svg" class="vue_logo" alt="logo" />
    <img src="../assets/icon.svg" class="App-logo" alt="logo" />
    <h3>Hi {{ agentName }}</h3>
    <p>Welcome to your first Vue app in Freshdesk</p>
    <fw-button id="fetch" v-on:click="fetchData()" color="secondary">
      Fetch Agent Name
    </fw-button>
  </div>
</template>

<script>
export default {
  name: "Sidebar",
  props: {
    client: Object,
  },
  data() {
    return {
      agentName: "Agent Name",
    };
  },
  methods: {
    fetchData() {
      this.client.data.get("contact").then(
        (data) => {
          this.agentName = data.contact.name;
        },
        (error) => {
          console.error("error", error);
        }
      );
    },
    showNotify(type, message) {
      this.client.interface.trigger("showNotify", {
        type: type,
        message: message,
      });
    },
  },
};
</script>

<style scoped>
.vue_logo {
  height: 40vmin;
  color: red;
}
</style>
From the GIF shown below, you can see that we can fetch the agent name with the changes we made to App.vue and Sidebar.vue
Now that we have passed the client object to the child components, let's use the request method exposed by the client object to fetch the current location of the International Space station.
Copy the following code snippet and update the Sidebar.vue
Sidebar.vue
<template>
  <div id="app" class="App">
    <fw-button id="fetch" v-on:click="fetchData()" color="secondary">
      Fetch the location
    </fw-button>
  </div>
</template>

<script>
export default {
  name: "Sidebar",
  props: {
    client: Object,
  },
  data() {
    return {
      agentName: "Agent Name",
    };
  },
  methods: {
    fetchData() {
      // API endpoint to fetch the current location of the International Space Station
      const API_BASE_URL =
        "https://api.wheretheiss.at/v1/satellites/25544/positions";
      // Timestamp for current time to get the location of International Space Station for a specified time.
      const timestamp = new Date().getTime();
      // HTTP request header
      const headers = {
        "Content-Type": "application/json",
      };
      // Options passed to the request method, consists of header, body and other objects with multiple functionalities
      const options = {
        headers,
      };
      // HTTP request to get the date from the
      this.client.request
        .get(`${API_BASE_URL}?timestamps=${timestamp}&units=miles`, options)
        .then(
          (location) => {
            this.showNotify(
              "success",
              `The location of ISS from the Data Storage is Latitude: ${
                JSON.parse(location.response)[0].latitude
              } , Longitude: ${JSON.parse(location.response)[0].longitude}`
            );
          },
          (error) => {
            // Error handling
            console.error("error", error);
          }
        );
    },
    showNotify(type, message) {
      this.client.interface.trigger("showNotify", {
        type: type,
        message: message,
      });
    },
  },
};
</script>

<style scoped>
.vue_logo {
  height: 40vmin;
  color: red;
}
</style>
In the above code snippet, the fetchData(){...} method fetches the current location of the international space station and then displays the location in the window through the interface method.
From the GIF shown above, we can see that the ‘Fetch the location' button invokes the fetchData(){...} method and fetches the current location of the ISS, and displays it in the window.
In the next step, we will save the fetched location in the Freshworks data storage and display the saved location instead of directly showing the location from the REST API.
To integrate Freshworks data storage to our Freshworks app, copy the following code snippet and update Sidebar.vue component.
Sidebar.vue
<template>
  <div id="app" class="App">
    <h3>Fetch Current Location of International Space Station</h3>
    <fw-button id="fetch" v-on:click="fetchData()" color="secondary">
      Fetch and Save
    </fw-button>
    <h3>Fetch the saved location from DB</h3>
    <fw-button id="fetch" v-on:click="fetchFromDataStorage()" color="secondary">
      Fetch
    </fw-button>
  </div>
</template>

<script>
export default {
  name: "Sidebar",
  props: {
    client: Object,
  },
  data() {
    return {
      ticketID: "",
    };
  },
  methods: {
    fetchData() {
      // API endpoint to fetch the current location of the International Space Station
      const API_BASE_URL =
        "https://api.wheretheiss.at/v1/satellites/25544/positions";
      // Timestamp for current time to get the location of International Space Station for a specified time.
      const timestamp = new Date().getTime();
      // HTTP request header
      const headers = {
        "Content-Type": "application/json",
      };
      // Options passed to the request method, consists of header, body and other objects with multiple functionalities
      const options = {
        headers,
      };
      // HTTP request to get the date from the
      this.client.request
        .get(`${API_BASE_URL}?timestamps=${timestamp}&units=miles`, options)
        .then(
          (location) => {
            this.saveInDataStorage({
              latitude: JSON.parse(location.response)[0].latitude,
              longitude: JSON.parse(location.response)[0].longitude,
            });
          },
          (error) => {
            // Error handling
            console.error("error", error);
          }
        );
    },
    saveInDataStorage(location) {
      this.client.db.set("location", location).then(
        (data) => {
          this.showNotify(
            "success",
            "Location saved successfully in the Data Storage"
          );
          console.info(data);
        },
        (error) => {
          console.error(error);
        }
      );
    },
    fetchFromDataStorage() {
      this.client.db.get("location").then(
        (data) => {
          this.showNotify(
            "success",
            `The location of ISS from the Data Storage is Latitude: ${data.latitude} , Longitude: ${data.longitude}`
          );
          console.info("data", data);
        },
        (error) => {
          console.error(error);
        }
      );
    },
    showNotify(type, message) {
      this.client.interface.trigger("showNotify", {
        type: type,
        message: message,
      });
    },
  },
};
</script>

<style scoped>
.vue_logo {
  height: 40vmin;
  color: red;
}
</style>
The above code snippet has three methods,
fetchData()
The fetchData(){...} method fetches the current location of the ISS using the REST API, and the location is passed as a parameter to the saveInDataStorage(){...} method as a JSON object.
saveInDataStorage()
The saveInDataStorage(){...} is a helper method to save the location in the Freshworks data storage.
fetchFromDataStorage()
The fetchFromDataStorage(){...} method fetches the saved location from the Freshworks data storage and displays it in the window using the showNotify interface method.
From the GIF shown above, we can verify that the Fetch and Save button fetches the current location of the ISS and saves it in the Freshworks data storage, and the Fetch button fetches the saved location from the data storage and displays it in the window.
In this tutorial, we have learned,
✅ How to build a Vue app from scratch using the FDK ✅ How to use platform features such as Request method, interface methods, data storage in a Vue app.
What's next?
Now that you are familiar with creating a basic Vuejs app using the FDK, you can add more complex Vue features like router and composition API.
You can also add more features to this app and integrate a geocoding API to display the city for the given coordinates. Instead of just showing the latitude and longitude, you can print the output relative to a city like "International Space Station is over the City X now"
Positive : You can find the completed code for this app in this repository(https://github.com/freshworks-developers/vue_International_space_station_app).