For a Generative AI powered app development experience, see Build an app with Freddy AI Copilot for Developers.
Notes:- Most of the steps in this section require you to use the appropriate developer tool to craft your app.
- Apps built to work on the Freshworks platform are compatible with the latest and immediately preceding version of the following browsers: Google Chrome, Firefox, Edge, Safari
- Install prerequisites.
- Install the FDK + CLI.
- Create an app.
- Build the app.
- Test the app.
- Validate and pack the app.
- Submit the app.
Install prerequisites
The FDK is a Node.js application. Before you install or use the FDK, install the following components on your system.
- Node Version Manager/NVM (Optional)
- Node.js v24.11.x.
Note:If Node.js v24.11.x or later is installed already on the system, skip this section and proceed with the FDK installation via NPM step.
There are following two methods to install the prerequisites.
Use this method to install Node.js v24.11.0 and the FDK together on your system via Homebrew (on MacOS and Linux) or Chocolatey (on Windows).
Note:If you already have Homebrew or Chocolatey installed on your system, skip this section and proceed with the FDK installation step. Otherwise, refer to the following information on installing Homebrew or Chocolatey.
- For MacOS or Linux: Install the latest version of HomeBrew.
- For Windows: Install the latest version of Chocolatey.
Note:If Chocolatey is already installed on your system, run the following command to run PowerShell scripts in the current session, bypassing any execution policy restrictions: Set-ExecutionPolicy Bypass -Scope Process -Force;
Install the FDK + CLI
Based on the installation information provided in the prerequisites section, refer to the steps in the following tabs to install FDK.
Notes:- If you already have the FDK v9.0.0 or later, and Node.js v18.13.0 or later installed on your system, you can skip this step and proceed to create an app.
- If you already have Node.js v18.13.0 or later installed on your system, refer to the information available in the via NPM tab to install FDK.
Run the following command to enable Homebrew to access the Freshworks CLI repository and auto-configure the CLI.
brew tap freshworks-developers/homebrew-tapRun the following command to install the latest CLI version.
brew install fdkThis command performs the following tasks:
Creates the custom_node_location folder in your system.
Note:The terminal displays the location where the custom_node_location folder is created.
Installs Node.js version 24.11.0, compatible with the CLI, into the custom_node_location folder.
Installs the Freshworks CLI in the same custom_node_location folder.
Add the following command to the appropriate environment file (.bash_profile, .bashrc, or .zshrc) on your system. This command loads the necessary settings required for using the CLI commands.
source "$(brew --repository freshworks-developers/homebrew-tap)/path.bash.inc"Apply the changes made to the environment file in the current terminal by either closing and reopening the terminal or by running the source ~/.{file_name} command. For example, source ~/.bashrc.
Run the following command to verify the CLI installation.
fdk versionEnsure that the installed CLI version is 10.0.0 or later.
- To uninstall the currently installed CLI version, use the brew uninstall fdk command.
- After uninstalling the CLI, to remove the CLI repository from the list of tapped repositories in your Homebrew configuration, use the brew untap freshworks-developers/homebrew-tap command.
- The Developer portal and SDK Terms of use apply to the use of the CLI.
Create an app
From the command-line, navigate to the empty directory in which you want to create an app.
Run the fdk create command. A prompt to choose a template is displayed.
Select serverless-starter-template. A new app with the following directories/files is created based on the template.
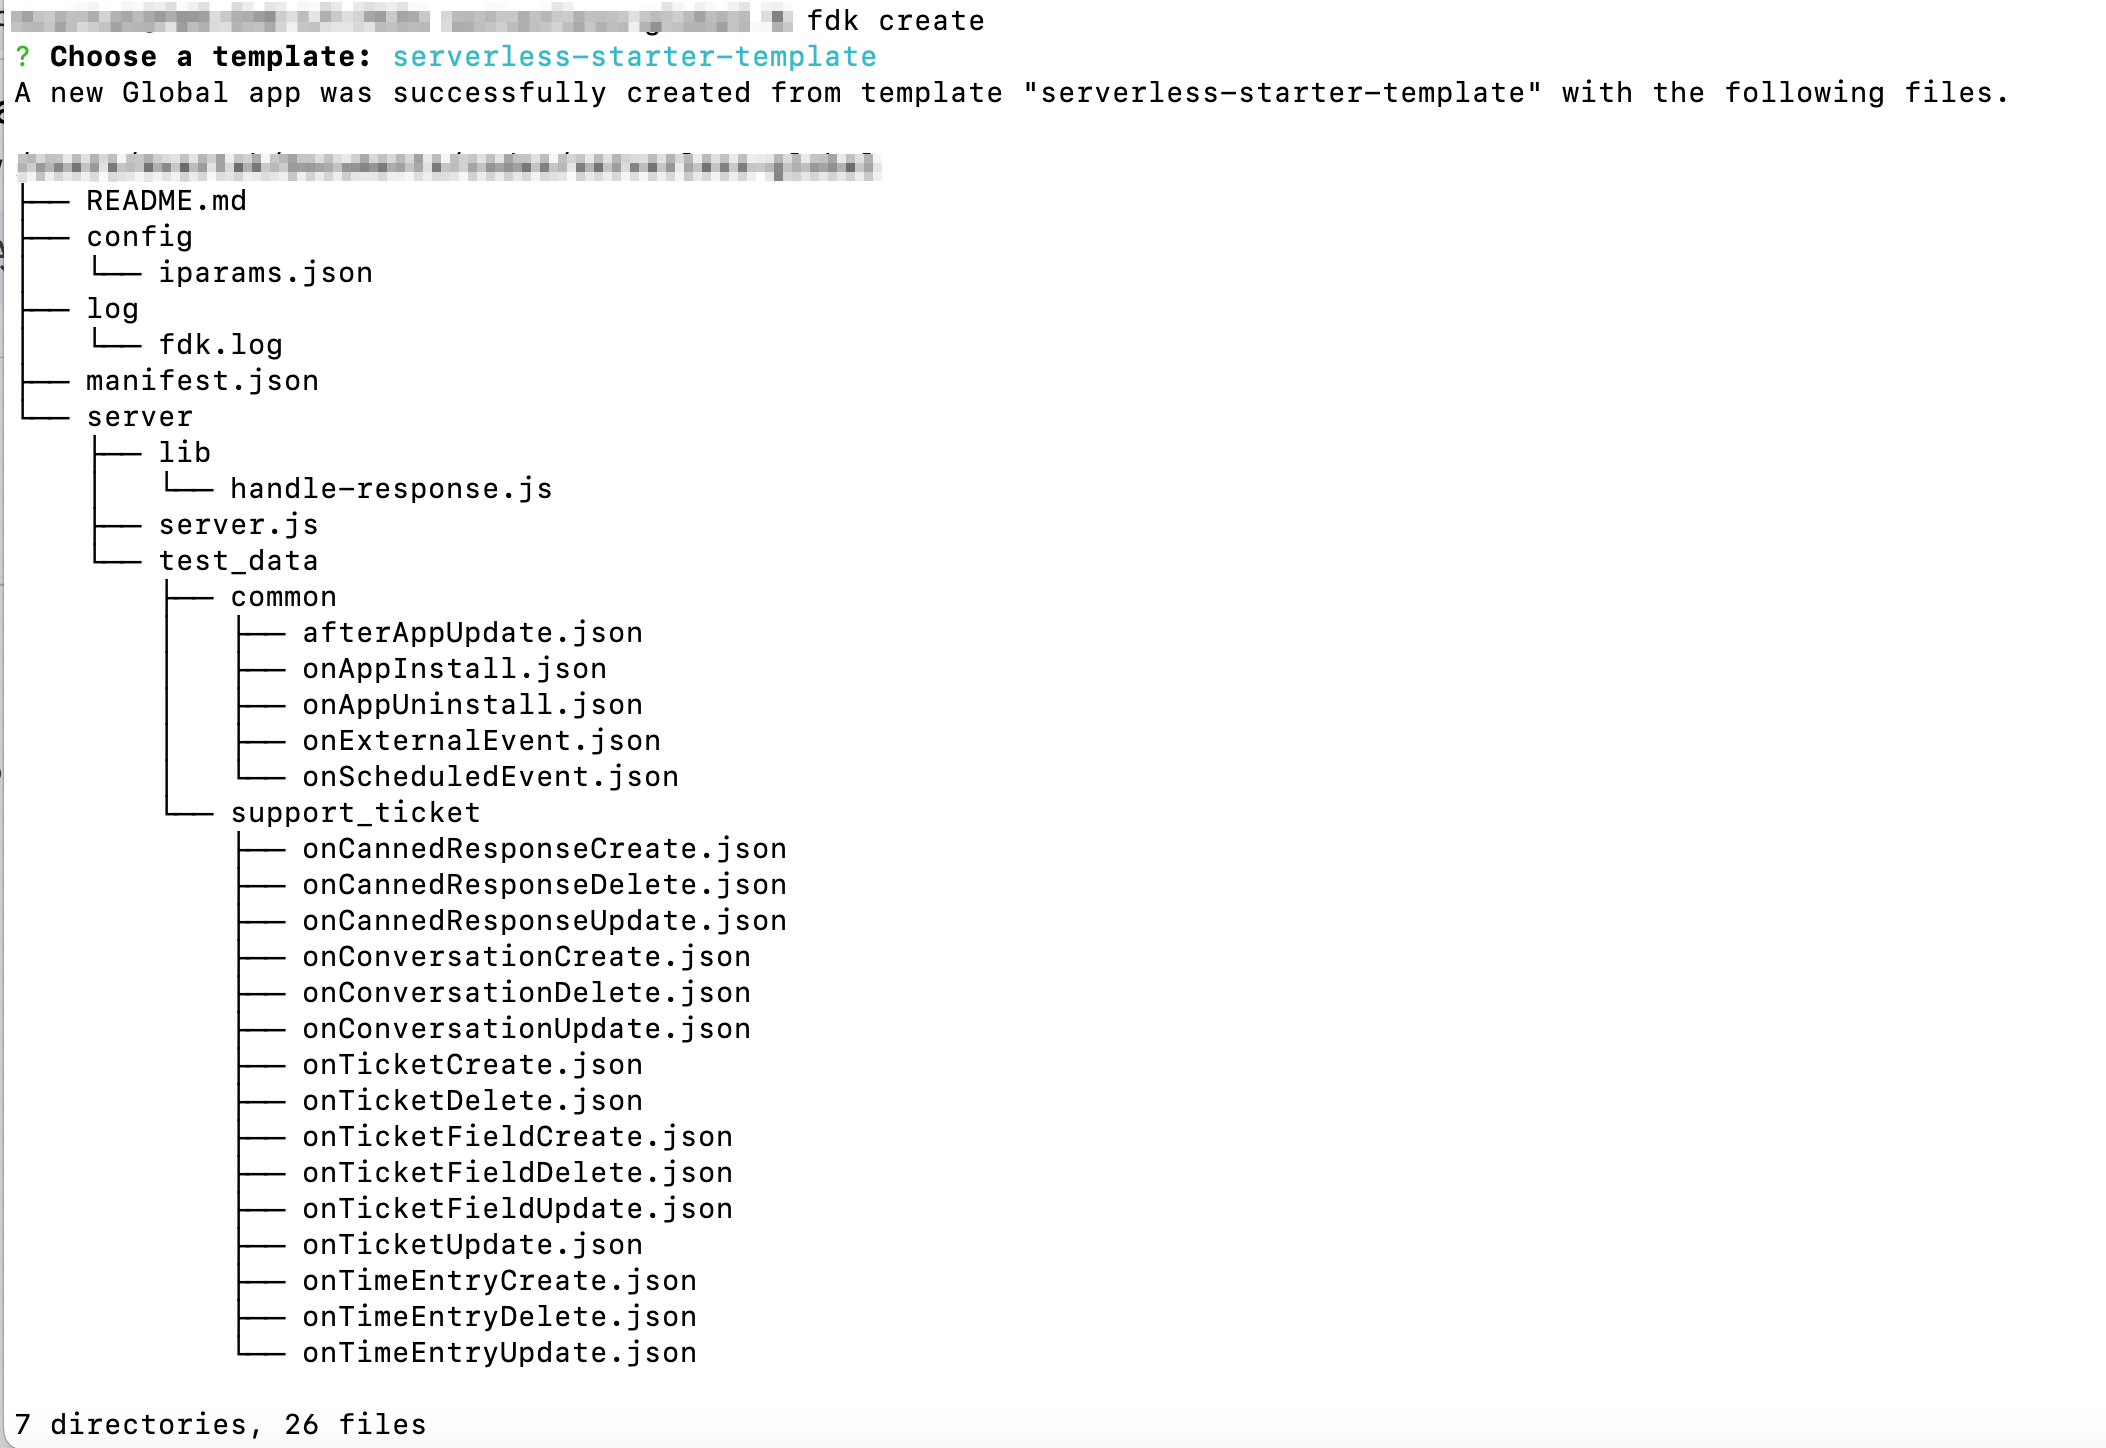 Directories and files that the create command generates for serverless-starter-template
The following directories and files are created as a result of the fdk create command.
Directory/File Description Important:When building an app, do not modify the default folder/file names. config/ Contains the installation parameters, request template, and OAuth configuration files. config/iparams.json Contains all the installation parameters whose values are set when the app is installed. For more information, see App settings. log/ Contains the files in which the app debugging information is captured. log/fdk.log Contains all debugging information, warnings, and errors generated when an app is created, run, packed or validated. manifest.json Contains details such as the platform version the app uses, modules to which the app belongs, common and module-specific event listeners for the app, the Node.js version, request templates that the app code uses, and FDK version used to build, test, validate, and pack the app, and npm packages that the app uses (dependencies). server/
(All js files are ES6 compatible)Contains files and folders related to a serverless app or the serverless component of an app. server/ lib Contains external libraries with methods that can be used in server.js. server/ lib/ handle-response.js Contains the method that can be used in server.js to handle the API responses. server/ server.js Placeholder file for your app logic (app code). server/ test_data
Includes files that contain sample payloads for the events that are simulated to test a serverless app.
By default, it contains sample payload data for serverless events of the common and support_ticket modules.
README.md Contains additional instructions, information, and specifications.
Build the app
Important:After you build a global app that works across modules and publish it to our marketplace, in the subsequent versions of the app, you cannot remove modules (that is, downgrade the number of modules).
After creating the default serverless app files, to build the app,
Implement your app logic.
Navigate to server.js and code your app logic.
Use our serverless events to formulate your app logic.
- For your app to react to app installation, updation, or uninstallation, use the appropriate app set-up events.
- For your app to react to events (such as contact creation, deletion, and so on) that occur in the product, retrieve the event-related information, and use the information to process the app logic, use the appropriate product events.
For your app to react to the events that occur in an external product or service, use external events.
For your app to react to precreated schedules, use scheduled events.
Use our developer toolkit to help solve specific requirements of your app.
To use npm packages, use our provision to include external libraries into your app files.
To place secure http calls from your app to a third-party domain, use the request method.
To enable communication between the various instances of your app, use the instance method.
To enable your app to access third-party resources that require an OAuth authentication, use the provision to place OAuth requests.
To persist and use data throughout your app’s lifecycle, use our data storage tools.
Test the app
Notes:- To test a serverless app, use the latest version of Chrome.
- As testing is only a simulation of events, actual data or record associated with the event is not created in the back-end. To create actual data and then test your event, publish your app as a custom app and test the events manually.
- The <app's root directory>/server/test_data folder stores the test payloads used to test the events. If you modify the app manifest to add more modules and register more events, the corresponding event payloads are updated to the test_data folder, when the event is simulated as part of event testing.
From the command line, navigate to the directory that contains the app related files and run the fdk run command. The FDK starts the local test server. The test URLs to access the product UI, the App Settings page (or Custom installation page), and the URL to the serverless events simulation page are displayed.
Navigate to the system settings page at http://localhost:10001/system_settings. All modules configured in the App manifest are listed.
In the system settings page,
Select the modules for which you want to test the app logic. During app testing, in the serverless events’ payloads, the selected modules are passed as currentHost.subscibed_modules.
The Organization Domain field is displayed, with a prompt to enter the organization domain value for the account.
In the Organization Domain field, enter the domain value from the organization URL for the account. For example, if your organization URL is https://sample.freshcaller.com, the value in Organization Domain should be sample.freshcaller.com.
Note:The org_domain attribute attribute will only be retirevied as a part of currentHost object in app installation page and app settings page.
The Enter account URL section is displayed, with a prompt to enter the account URLs for all selected modules.
In the Enter account URL section, enter valid account URL(s) for the product(s) to which the selected modules belong. During app testing, this URL plays the role of the currentHost.
Based on the currentHost, the currentHost.subscribed_modules, currentHost.org_domain and currentHost.endpoint_urls are determined. In the response payload of the currentHost data method and in the serverless events’ payloads, the determined values are used.
If your app manifest includes the service_ticket or service_user modules and you select either of them, the Select Freshservice Product Type section will appear.
In this section, choose the appropriate product type: ITSM or MSP.
NoteIf your app manifest does not include the service_ticket or service_user modules, or if you have not selected either of them, the Select Freshservice Product Type section will not be displayed.
If you have defined the app scope as both service_workspace and account or service_workspace alone in your app manifest, then the workspace_id field appears. Enter the workspace ID of the client (workspace) for which you want to install the app.
To find the workspace_id:Navigate to the particular workspace in the workspace section and locate the URL. For example, if the URL is https://sample.freshservice.com/a/admin/workspaces/2/edit,then the workspace_id is 2.
Notes:- The currentHost payload returns the workspace ID.
- If the installation scope in the app manifest is set to both account and service_workspace, the workspace_id field is optional on the system settings page.
- If the installation scope in the app manifest is set to service_workspace only, the workspace_id field is mandatory on the system settings page.
- If the installation scope in the app manifest is set to account only, the workspace_id field is not shown on the system settings page.
Click Continue.
If you have configured installation parameters for the app, the App Settings page is displayed at http://localhost:10001/custom_configs. Enter appropriate values for the installation parameters and click Install.
Note: If you have not configured any installation parameters, a page is displayed with information on the configured system settings. A message stating that the app does not have an installation page is displayed.
Navigate to http://localhost:10001/web/test to test the serverless events that the app uses. All modules that you select in the system settings page, for which serverless events are registered in the app manifest, are listed in the Select module drop-down.
Note:The payloads of all serverless events that are registered in the app manifest are populated in the server/test_data folder. During the actual runtime, the payloads that are passed to the serverless event contain the currentHost attribute. In the local simulation, the payloads in server/test_data do not contain this attribute. During testing, the modules, account URLs, and organization domain value entered in the system settings page are passed as the currentHost data.
From the Select module drop-down, select the module whose events you want to test. The Select an event drop-down is displayed and it lists all the events configured (in the app manifest) for the selected module.
Note: To test app setup events, select onAppInstall, afterAppUpdate, or onAppUninstall. To test external events, select onExternalEvent. To test scheduled events, select onScheduledEvent. To test a product event, select the corresponding product event’s name.
From the Select an event drop-down, select the event you want to test. The payload for the event is populated on the page.
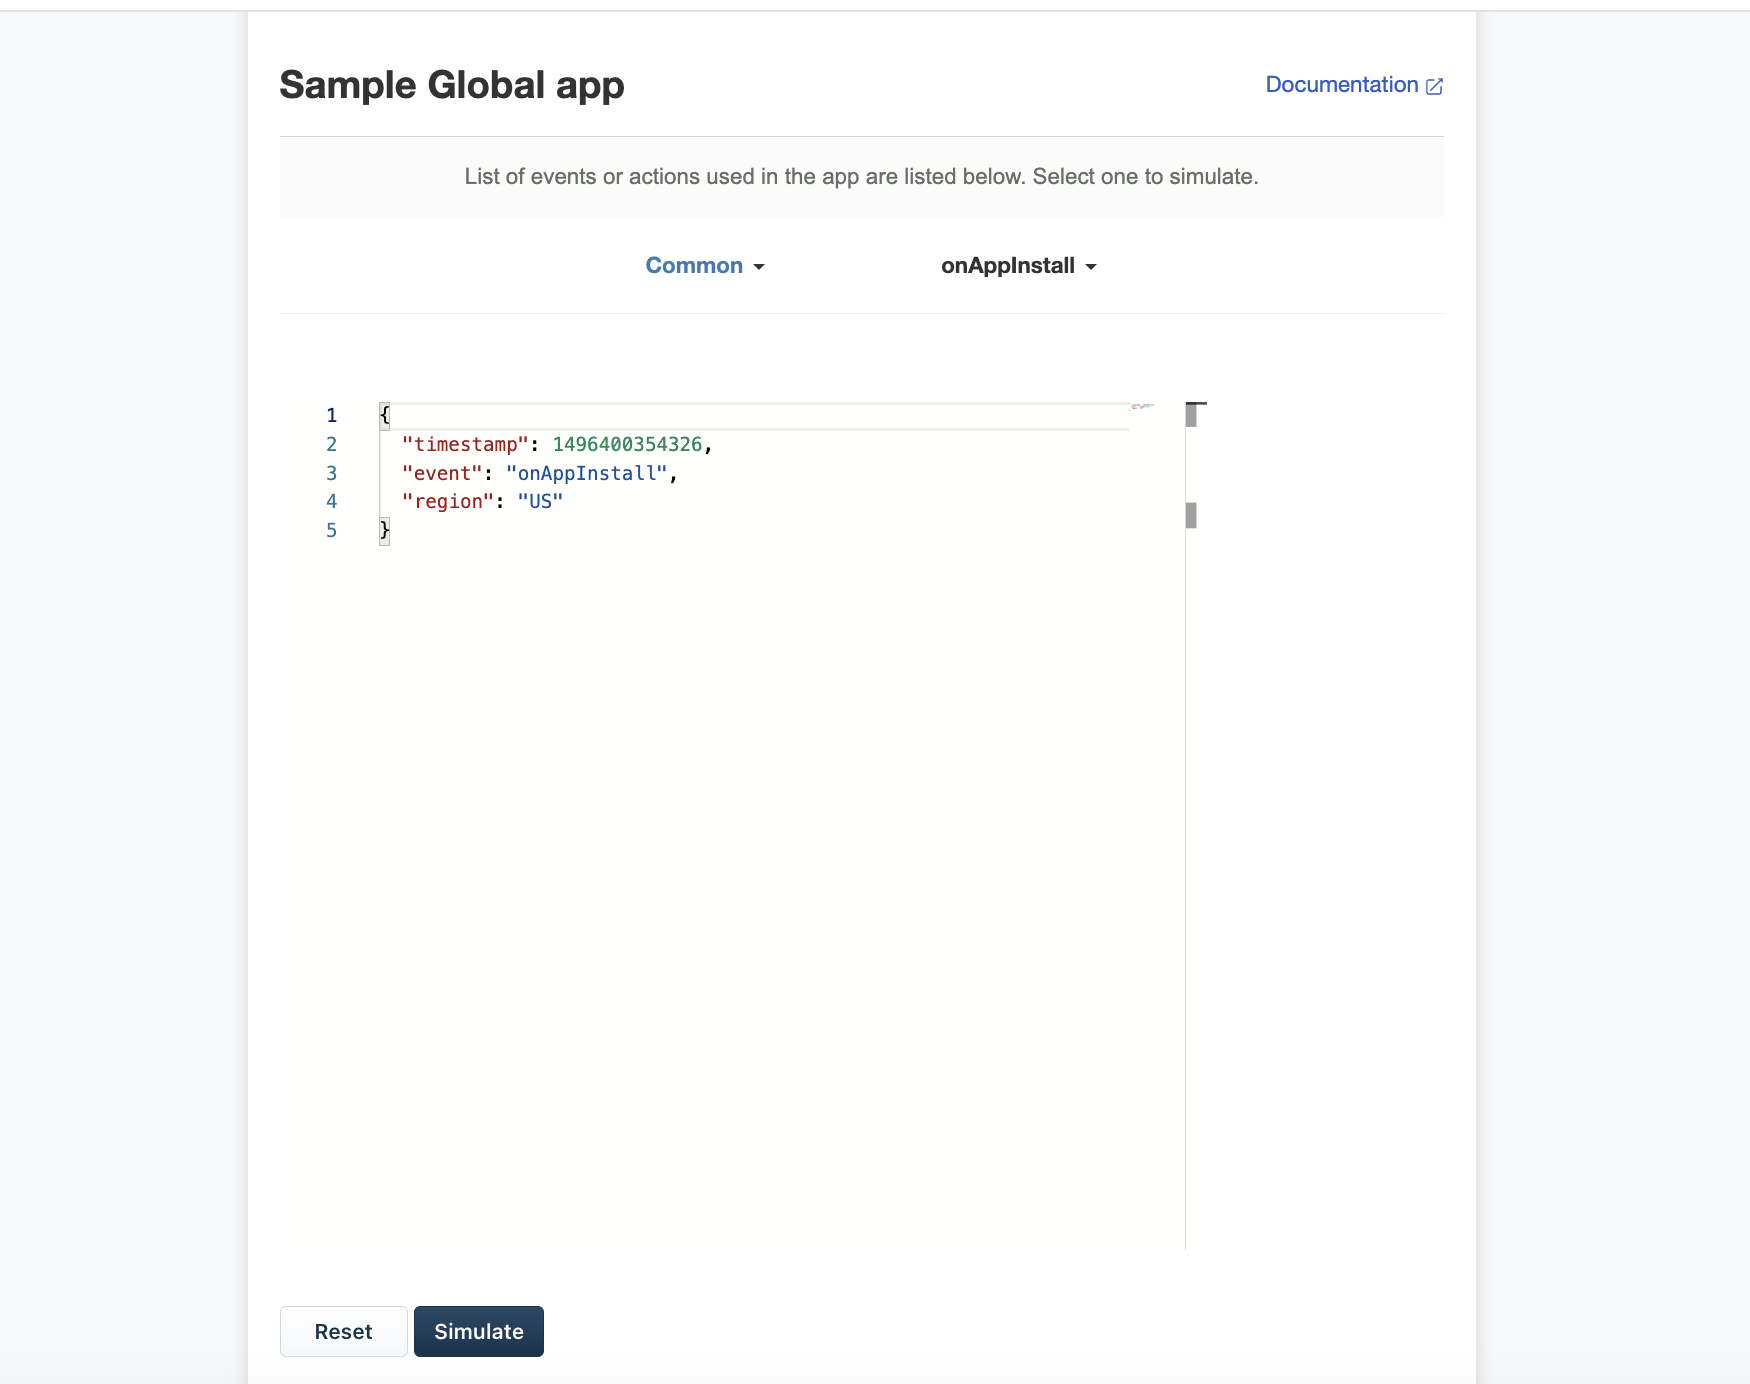 Event simulation page
Click Simulate. If the event is simulated successfully, the Simulate button’s display name changes to Success. The event payload is added to the <app's root directory>/server/test_data folder.
To test more events, select another appropriate module and event and click Simulate. If the event simulation fails because of invalid payload data, the Simulate button’s display name changes to Failed. Modify the payload appropriately and click Simulate.
Validate and pack the app
To validate the app code for errors and pack the app for submission:
Notes:- In the following procedure, <DIR> is the directory path to the folder containing the app files that are validated for errors or packed.
- Ensure that at least one module apart from the common module is registered in the app manifest.
- A front-end app built for the common module is accessible from a product’s left navigation pane - either from the full-page-app placeholder or CTI app placeholder. For a front-end app built to work with only the common module, do not include caller_agent, call, caller_metrics, notification, chat_conversation, or chat_user as the other module(s), if they are the only modules other than common. This is because the products that support these modules do not support app deployment on the left-navigation pane.
- Ensure that the iparams.json > <iparam-name>.modules contains only modules that are registered in the app manifest.
- If you are a developer who has been building apps for our ecosystem in the product-based landscape and migrating to the module landscape, when configuring iparams, ensure not to use the domain, api_key iparam types and the corresponding type_attributes. You can use the text type to obtain the domain value from your app users.
From the command line, navigate to the directory that contains the app related files and run the following command.
fdk validateOr
From the command line, run the following command.
fdk validate --app-dir <DIR>If there are errors in the code, corresponding violations are displayed. Ensure to fix all violations before packing the app. Reference: App validation.
To fix all lint errors for which auto-fix support is available, run the following command.
fdk validate --app-dir -fix <DIR>To pack the app for submission, run one of the following commands.
fdk packfdk pack --app-dir <DIR>A dist/<app_directory>.zip file is generated.
Submit the app
To publish the app to the Freshworks Marketplace, navigate to the developer portal and upload the validated and packed app file. You can use the Login button in the header of this webpage to navigate to the developer portal.
For detailed app submission steps, see App submission process.
Note:To know all the platform restrictions and constraints, see Rate limits and constraints.