If you prefer to build the interface of your Installation (Settings) page, you can build a custom page. The custom page can,
- Contain elements such as nested fields, toggles, sliders, date and time pickers, mappers, and so on.
- Be rendered differently for the different modules on which an app is deployed.
- Be dynamic and perform client-side validation of the input iparams’ values.
For a demonstration of how to build an app settings page using iparams.html, see the sample global app - iparams.
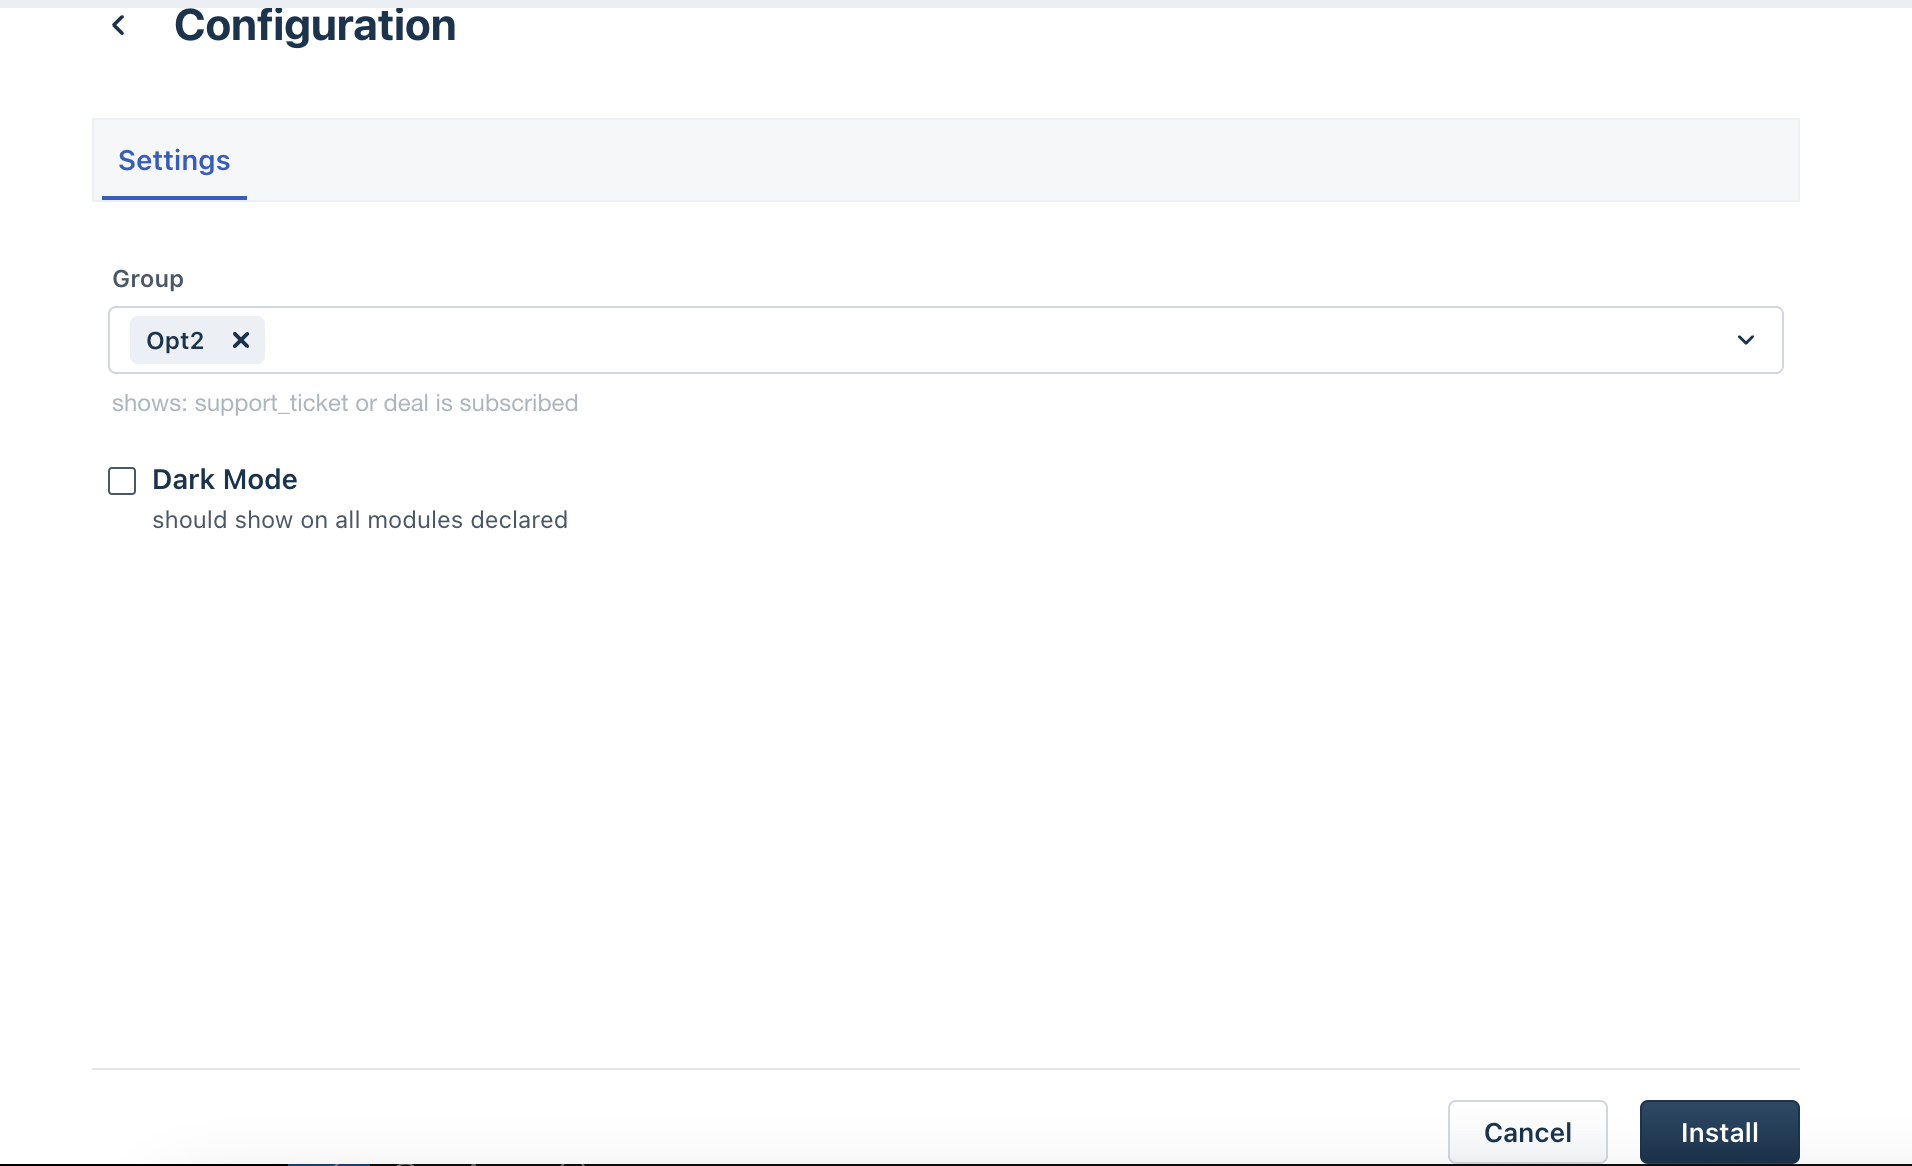 Example custom installation (Settings) page
To create and use a custom Settings page:
- Create the iparams.html file to render the user interface of the custom installation page. In the iparams.html file, include the reference to all required assets such as HTML, CSS, and JavaScript (JS) files.
- Create the config/assets/iparams.js file.
- To render module-specific custom installation page, in iparams.js:
- Use the app.initialized() method to initialize the app and retrieve the client reference.
- Use the client.data.get(currentHost) method, to retrieve the list of modules the app user has subscribed to.
- Implement module-specific hide/show logic to render components on the custom installation page.
- In the iparams.js file, add the postConfigs method to retrieve the iparams as form fields with values and store them.
- Use the meta tag to map iparams to modules, when the iparams are stored.
- Use the meta tag to declare certain iparams as secure iparams.
- In the iparams.js file, add the getConfigs method to retrieve the stored iparams’ values alone and populate the Edit Settings page.
- To perform client-side validation of the iparams entered, in the iparams.js file, add the validate method.
- Retrieve the stored iparams and use them in apps.
Note:For serverless apps, the iparams defined in the custom installation (Settings) page are passed as part of the JSON payload sent to the callback.
Create custom iparams
- Navigate to the config directory and create an iparams.html file. Note:Ensure that the config directory contains only one of the two files - iparams.json or iparams.html.
- In the iparams.html file:
Include the required HTML, CSS, and JS dependencies.
Note:By default, when you use the generate command and generate the iparams.html file, the freshworks css (https://static.freshdev.io/fdk/2.0/assets/freshworks.css) is included in the file.
Include the appclient through <script src="{{{appclient}}}"></script>
Include the logic to render the installation page UI components.
- Navigate to the config directory and create the assets folder.
- In the assets folder, create all necessary .css and .js files that are declared as dependencies in iparams.html.
- You can add external assets, such as .css and .js, in the config/assets folder to render the custom installation (Settings) page, validate the iparams’ values, store and retrieve the iparams.
- Only Request method, Server method invocation, and Jobs methods can be used (for any validation or data syncing purpose) while creating a custom installation page.
- For apps built with the meta framework, enable access to the configuration methods( getConfigs, postConfigs, validate) by assigning them to the window object. For more information, see Setting configuration and validation methods globally.
Render module-specific installation page
A global app can be built to work across multiple modules. You can build your custom installation page such that the installation page shows iparam fields that are relevant to a module.
To do this,
Navigate to the config/assets/iparams.js file.
Use the app.initialized() method as shown in the SAMPLE IPARAMS.JS. App initialization occurs when the parent application (the product on which the app is deployed) is loaded for the first time.
If app initialization is successful, the parent application (the product on which the app is deployed) passes a client reference to the app.
Use the client reference to run the client.data.get(currentHost) method. This retrieves the list of modules the app user has subscribed to.
Use the sample code shown on the right pane, to implement module-specific hide or show logic for the installation page components.
Use postConfigs method
To store the installation parameter values entered in the custom installation page, include the postconfigs method in the iparams.js file. The method is triggered when, on the custom installation (Settings) page, Install is clicked. The method stores the iparams and corresponding values entered in the custom installation (Settings) page, as JSON key-value pairs.
Use _meta tag
Declare secure iparams: Some iparams are used to collect sensitive data, which has to be protected from exposure through the app’s front-end components. Use the sample code on the right pane, to declare an iparam as a secure iparam. When using the secure iparam values entered in the custom installation (Settings) page, use the Request method.
Notes:- To mark nested objects as secure, you can add the iparams as objects in the nested JSON.
- Secure iparams cannot be accessed in the front-end component of the app; attempting to do so will result in an undefined error.
Map iparams to modules: You can map the custom iparams that you create with the modules registered in the App Manifest. The iparams become applicable only to the mapped modules. Use the sample code on the right pane, to know how to map iparams to modules.
The iparams’ values configured for an app during installation can be edited by loading them onto the Edit Settings page. When loaded, if an iparam is mapped to a module, the iparam is displayed on the page only if the module is a valid module of the product where the app is installed.
Important:- If an iparam is not mapped to a module, it is displayed for all the modules.
- This mapping is used only when the iparam is populated for editing. For initially displaying or hiding the iparams on the Installation page, use the procedure in the Render module-specific installation page section.
Use getConfigs method
To retrieve the stored iparams’ values and populate them on the Edit Settings page, include the getconfigs method in the iparams.js file. The method is triggered when you click the Settings menu button on the Manage Apps page > Installed Apps tab.
If an iparams - module(s) mapping exists, only the iparams relevant to the product (modules) on which the app is installed, are retrieved and populated in the Edit Settings page.
Use validate method
To validate the values entered on the Settings page or the Edit settings page, use the sample code on the right pane and include this method in the iparams.js file. The method is triggered when:
- During installation, users enter iparam values and click Install on the Installation page.
- After installation, users edit iparam values on the Edit Settings page.
If the method returns false, the installation is stopped or the iparam values are not saved.

Retrieve
For information on how to retrieve the configured iparams and to use them in the app components, see the Retrieve iparams section.
Test iparams
To test the configured installation parameters:
From the command line, navigate to the directory that contains the app related files and run the fdk run command.
The FDK starts the local test server. The test URLs to access the product UI, the App Settings page (or Custom installation page), and the URL to the serverless events simulation page are displayed.
Navigate to the system settings page at http://localhost:10001/system_settings. All modules configured in the App manifest are listed.
In the system settings page,
Select the modules for which you want to test the app logic. The Enter account URL section is displayed, with a prompt to enter the account URLs for all selected modules.
The Organization Domain field is displayed, with a prompt to enter the organization domain value for the account.
In the Organization Domain field, enter the domain value from the organization URL for the account. For example, if your organization URL is https://sample.freshdesk.com, the value in Organization Domain should be sample.freshdesk.com.
The Enter account URL section is displayed, with a prompt to enter the account URLs for all selected modules.
In the Enter account URL section, enter valid account URL(s) for the product(s) to which the selected modules belong. During app testing, this URL plays the role of the currentHost.
Based on the currentHost, the currentHost.subscribed_modules, currentHost.org_domain and currentHost.endpoint_urls are determined. In the response payload of the currentHost data method and in the serverless events’ payloads, the determined values are used.
If your app manifest includes the service_ticket or service_user modules and you select either of them, the Select Freshservice Product Type section will appear.
In this section, choose the appropriate product type: ITSM or MSP.
NoteIf your app manifest does not include the service_ticket or service_user modules, or if you have not selected either of them, the Select Freshservice Product Type section will not be displayed.
Click Continue.
If you have configured installation parameters for the app, the App Settings page is displayed at http://localhost:10001/custom_configs. Enter appropriate values for the installation parameters and click Install.
Note:If you have not configured any installation parameters, a page is displayed with information on the configured system settings. A message stating that the app does not have an installation page is displayed.
To reselect modules or reenter account URLs, on the App Settings page, click Back.