OAuth is a secure way for your app to access Freshworks resources without asking for or saving sensitive user credentials of your app user.
To implement the OAuth flow in your Freshworks app that accesses Freshservice resources,
- Create the OAuth credentials for your app.
- Set up the OAuth configuration file.
- Use the request method to place the request to OAuth-secured resources.
- Handle token lifetime.
- Test the OAuth flow.
- Publish your app.
After Freshworks generates the OAuth credentials for your app, you can modify the Redirect URLs and App Scopes, if required. For information on how to do this, see Update OAuth credentials.
Create OAuth credentials
Navigate to the Freshworks developer's login page. The Enter your organization URL page is displayed. For information about the organization URL, see What is organization URL?
Enter your organization or account URL and click Proceed. The Freshworks developer home page is displayed.
From the top navigation bar, click the settings icon
 . The Settings page is displayed.
In the OAuth Credentials section, click Create OAuth Credentials. The Create New OAuth Credentials page is displayed.
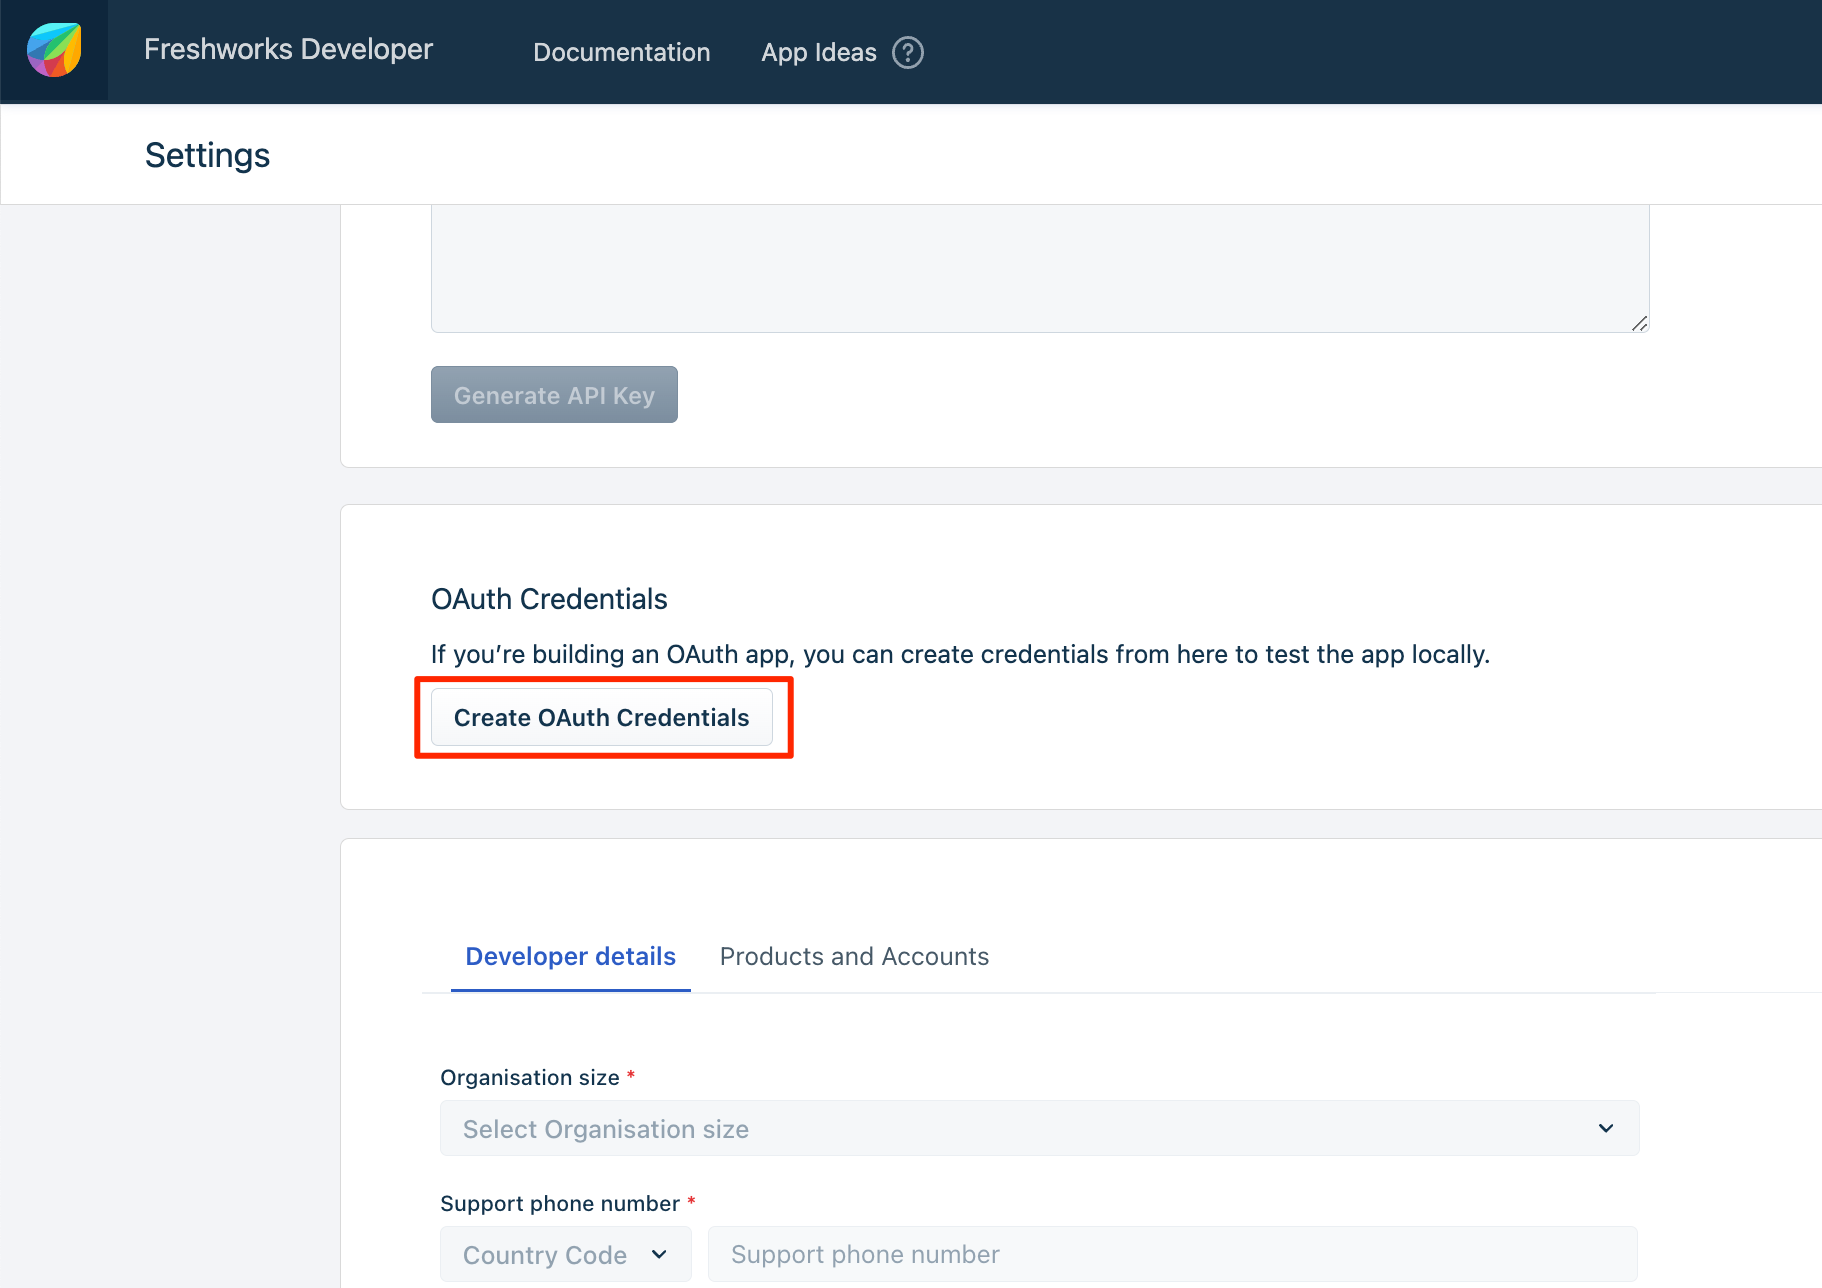 Create OAuth Credentials
Enter or select appropriate values in the following fields and sections.
Note:In the Redirect URL section, set the URL according to the following environment requirements:
- Local: http://localhost:10001/auth/callback
- Production: https://oauth.freshdev.io/auth/callback
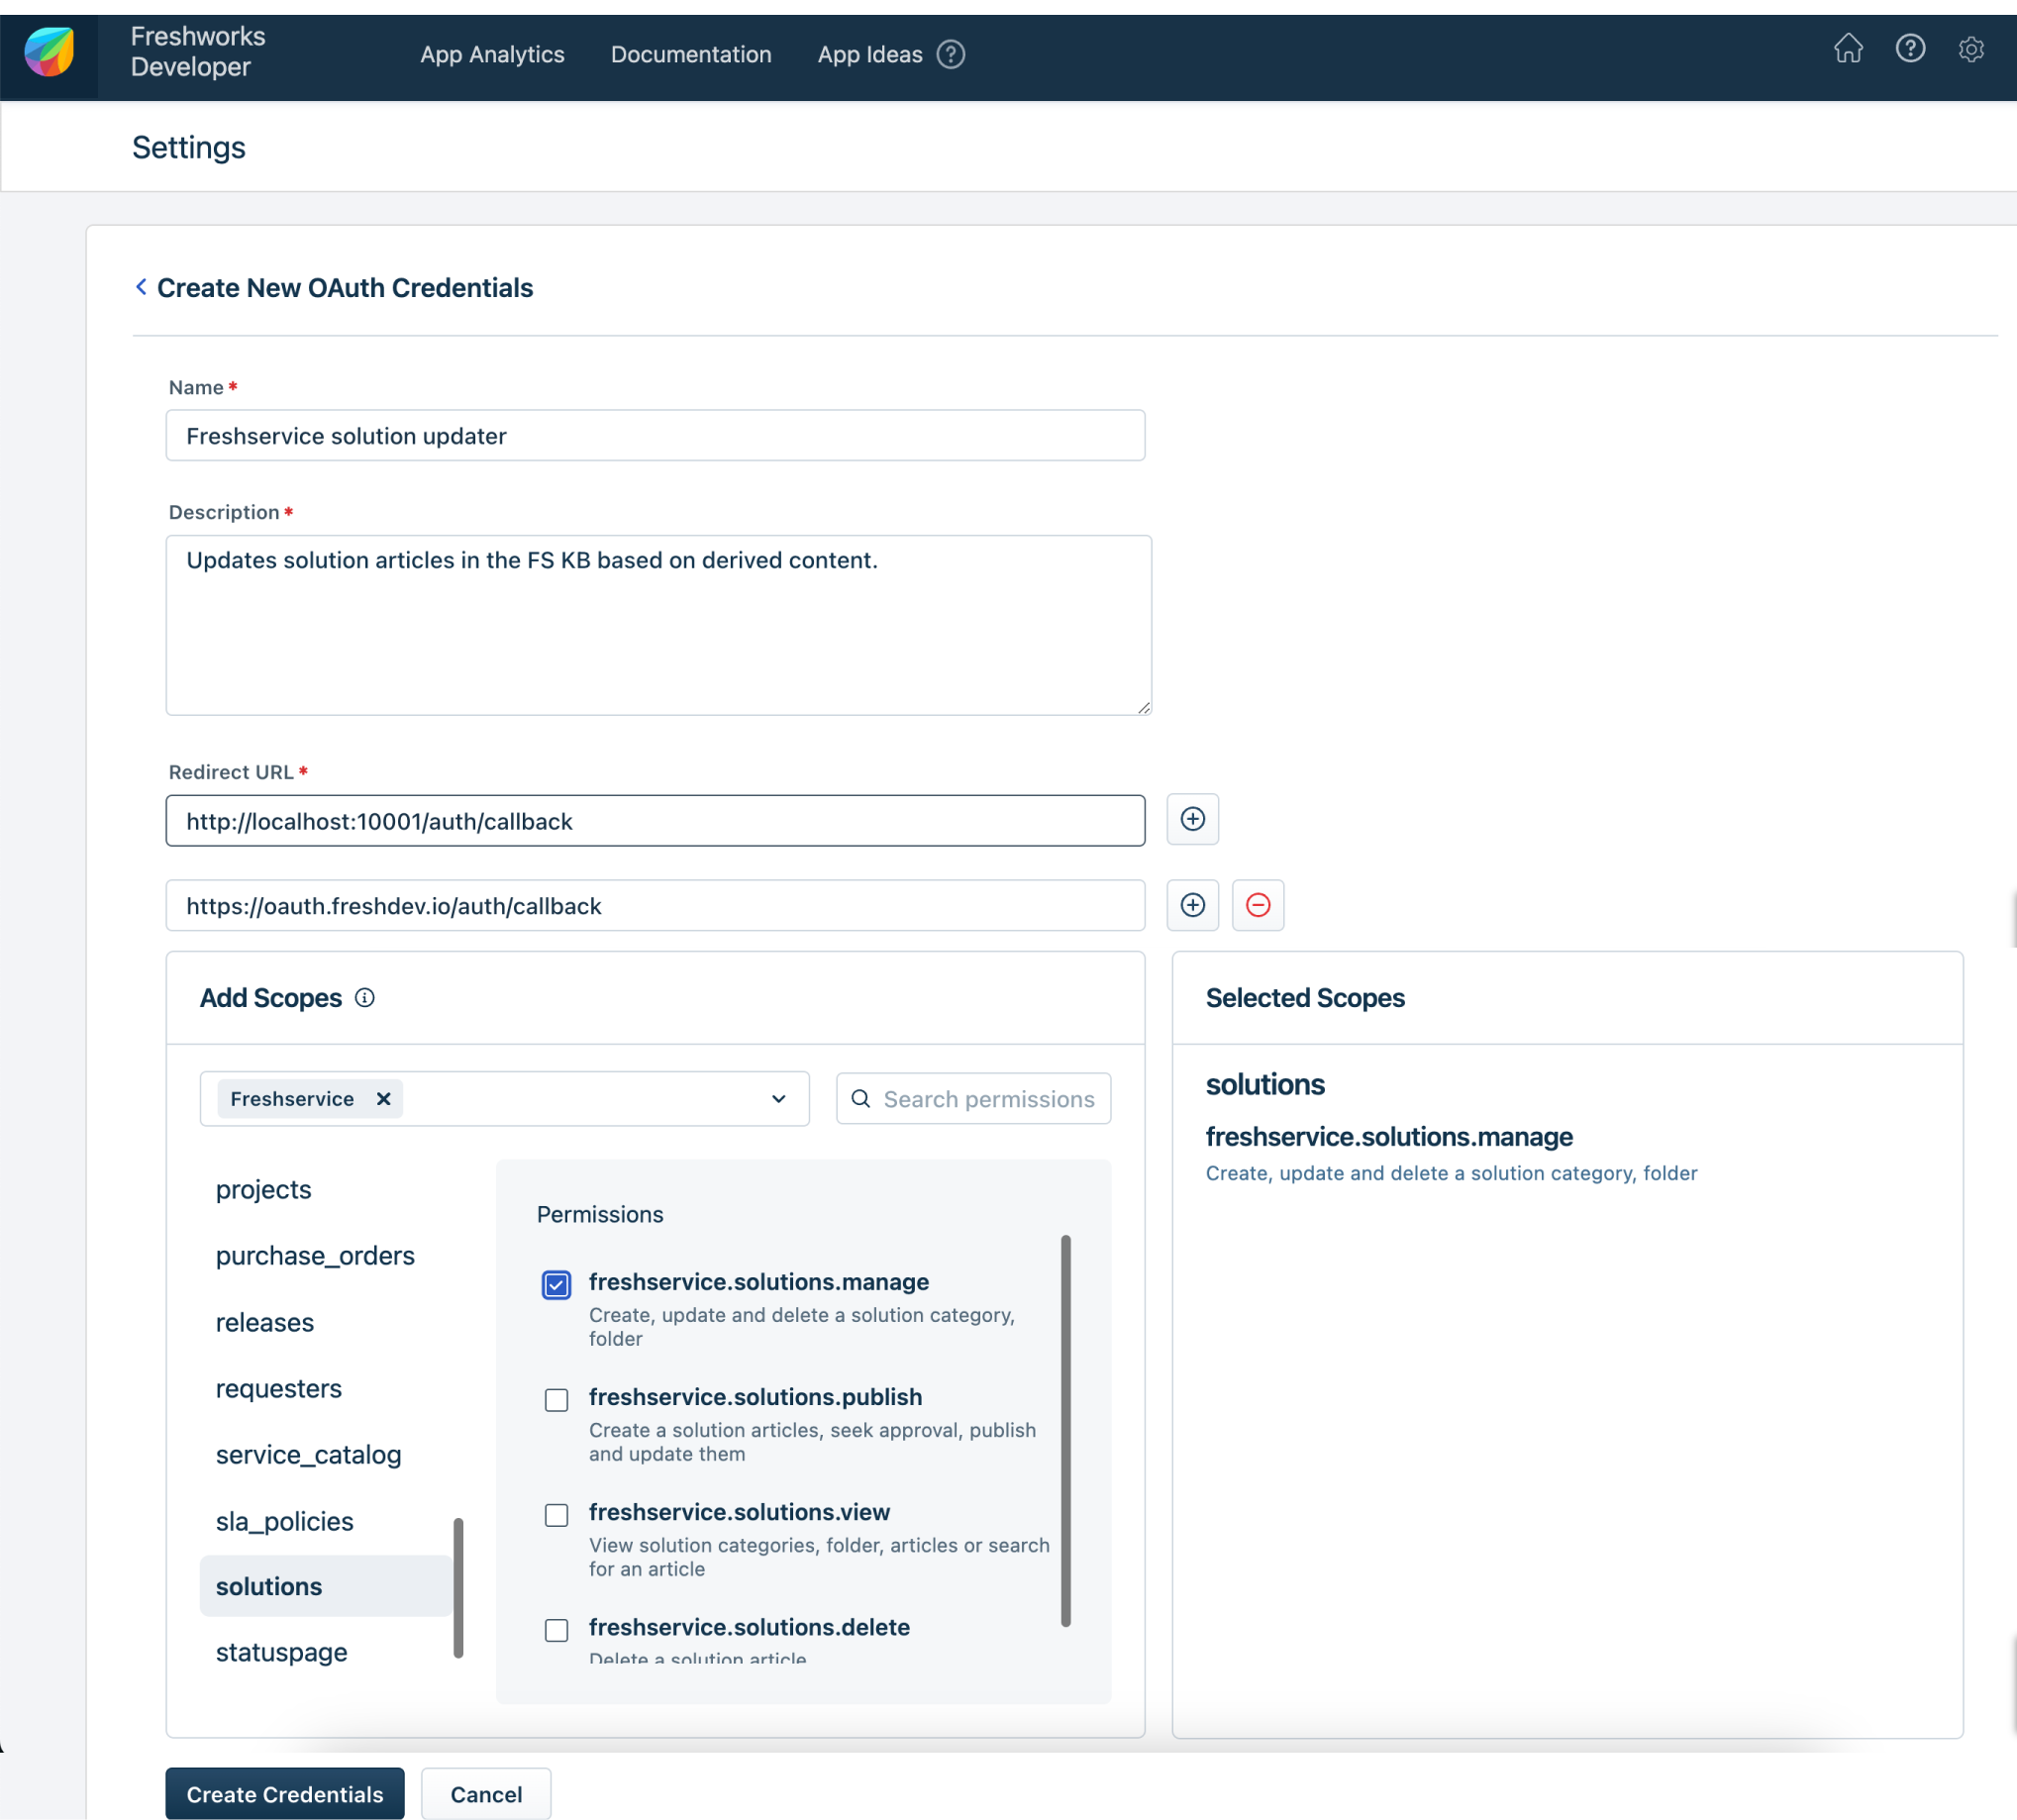 Create New OAuth Credentials page
Fields / Section Description Name
Mandatory
If you are creating the OAuth credentials for a new app, enter a meaningful name for your app; a name not exceeding 3 words. This name helps app users who authorize the app, to identify the app.
When creating the OAuth credentials for an existing app, to provide a consistent OAuth experience for your app users, we recommend that you enter the same name specified in the app details or app submission page.
When app users authorize an app and grant permission to access their Freshworks resources, the app name you enter here is displayed in the authorization window.
Description
Mandatory
Enter a brief description of the app’s functionality and features.
When app users authorize an app, the short description you enter here is displayed in the authorization window.
Redirect URL
Mandatory
Enter the URL(s) to which Freshworks sends the app user’s authorization decision.
You can enter up to a maximum of five redirect URLs. This facilitates easy local testing and move to production. You do not have to regenerate the Redirect URL(s) when you move your app from local testing to production.
For the local testing of OAuth apps, specify at least one of the redirect URLS as the address of the local host.
Add scopes
Mandatory
Scopes decide the level of access your app has to the Freshworks resources.
In the Add scopes section, depending on the product(s) selected, all resources the app can access are listed. For each resource, all possible access permissions are listed.
- Select the product(s).
- Navigate to the resources that your app intends to access. A list of all possible access permissions is displayed.
- Select the checkboxes next to the access permissions to declare the scopes required for the app.
Click Create Credentials. The app’s credentials page is displayed. The prepopulated Client ID and the Client Secret fields are displayed. Use these values to configure the OAuth credentials JSON.
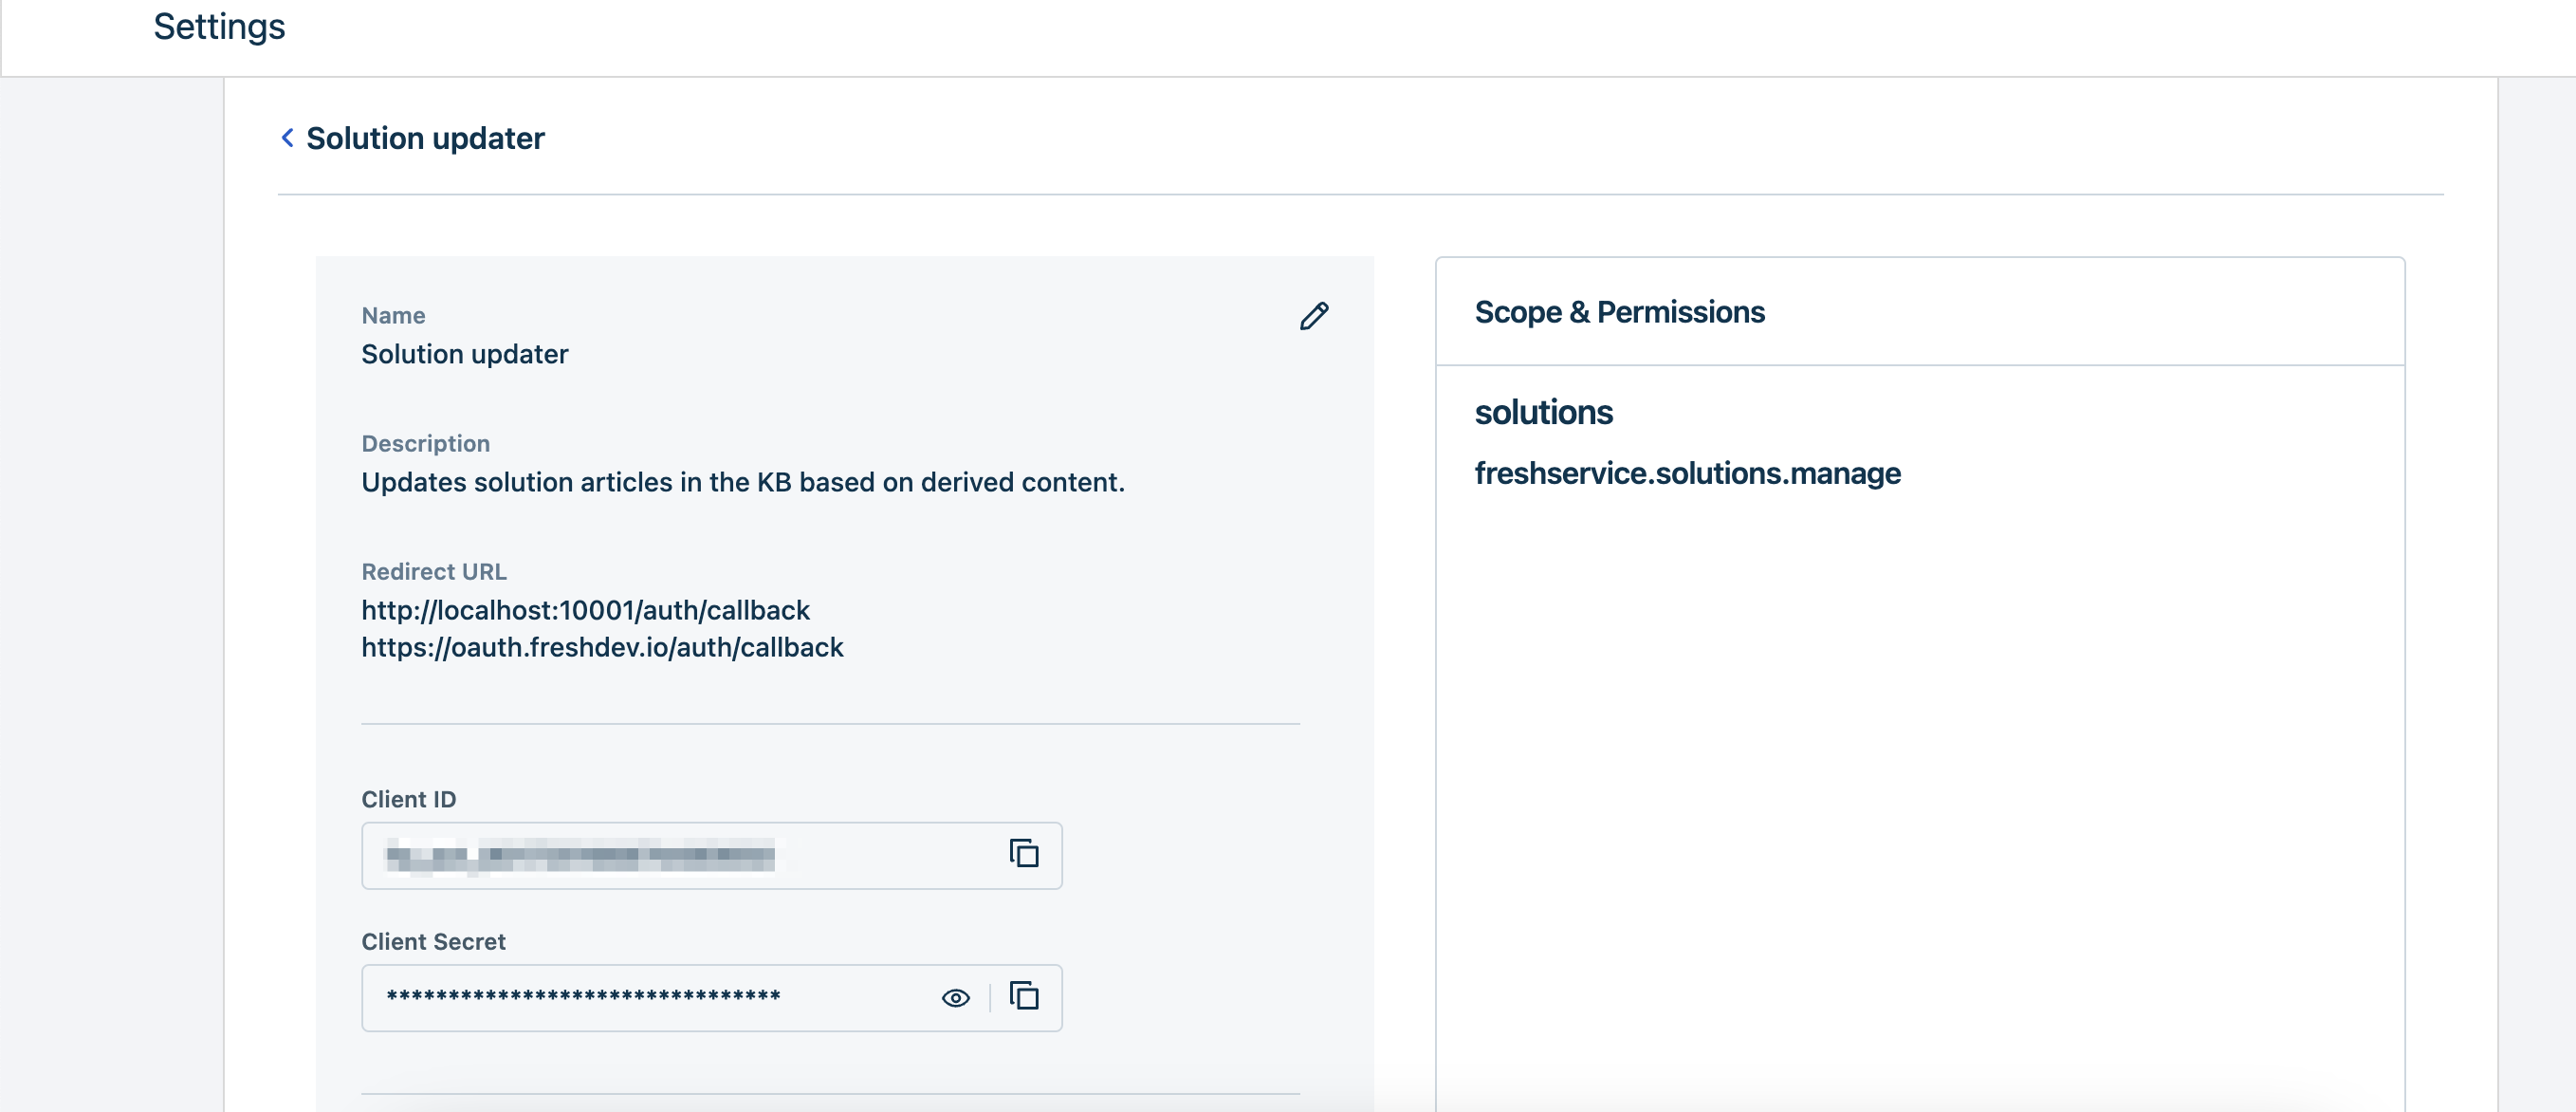 OAuth Credentials details page
Update OAuth credentials
After creating the OAuth credentials, you can update the credentials to, align with app detail changes such as changes to the app scopes or redirect URL(s).
To do this,
Navigate to the Freshworks developer's login page. The 'Enter your organization URL' page is displayed.
Enter your organization or account URL and click Proceed. The Freshworks developer home page is displayed.
From the top navigation bar, click the settings
icon. The Settings page is displayed.In the OAuth Credentials section, click View Existing OAuth Credentials. The OAuth Credentials page with a list of all the OAuth credentials generated from your account are displayed.
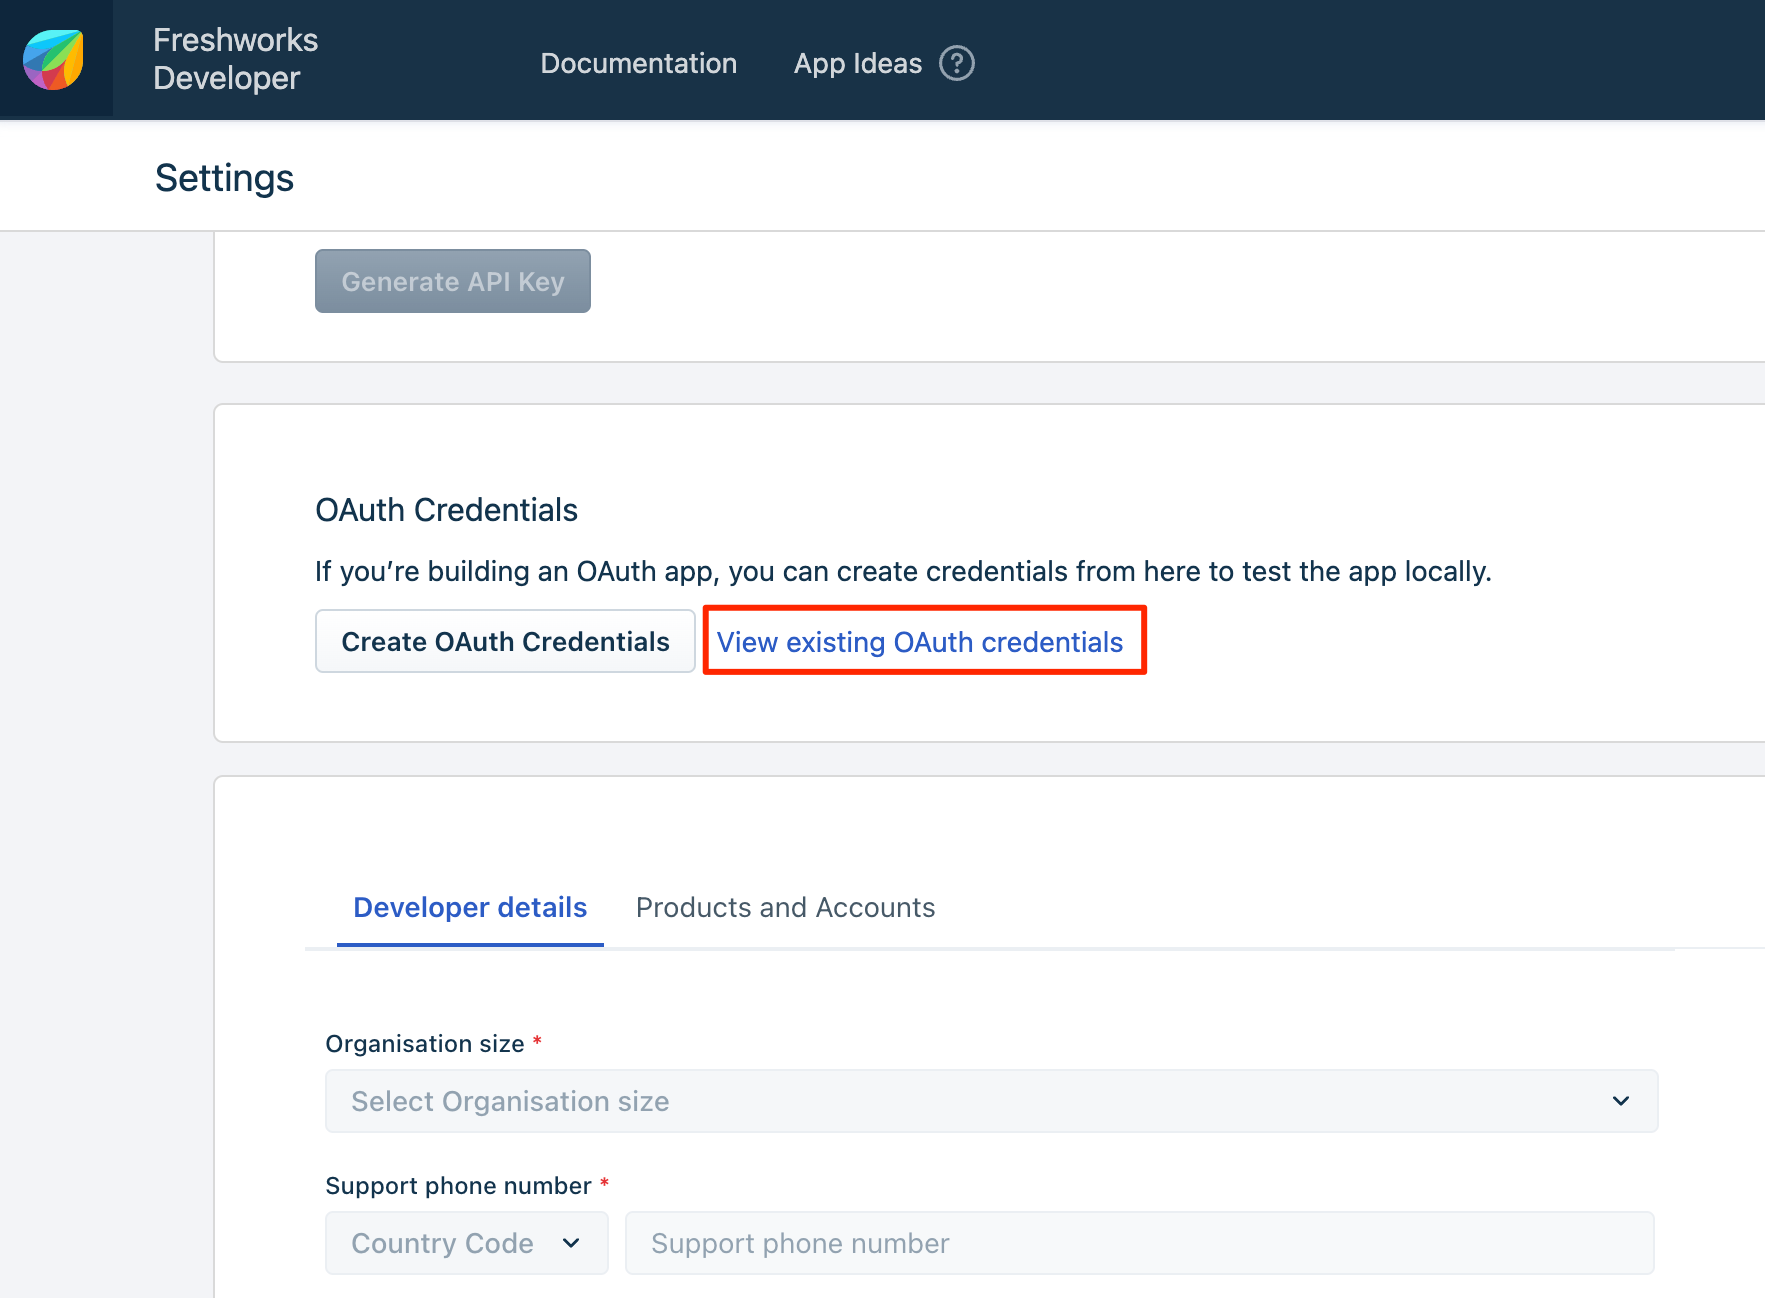 View existing credentials
 OAuth credentials page - All configured credentials
Click View in the same row as the app name. The OAuth Credentials Details page corresponding to the app is displayed.
OAuth Credentials details pageClick the edit icon
 next to the app name. The Update OAuth Credentials page is displayed.
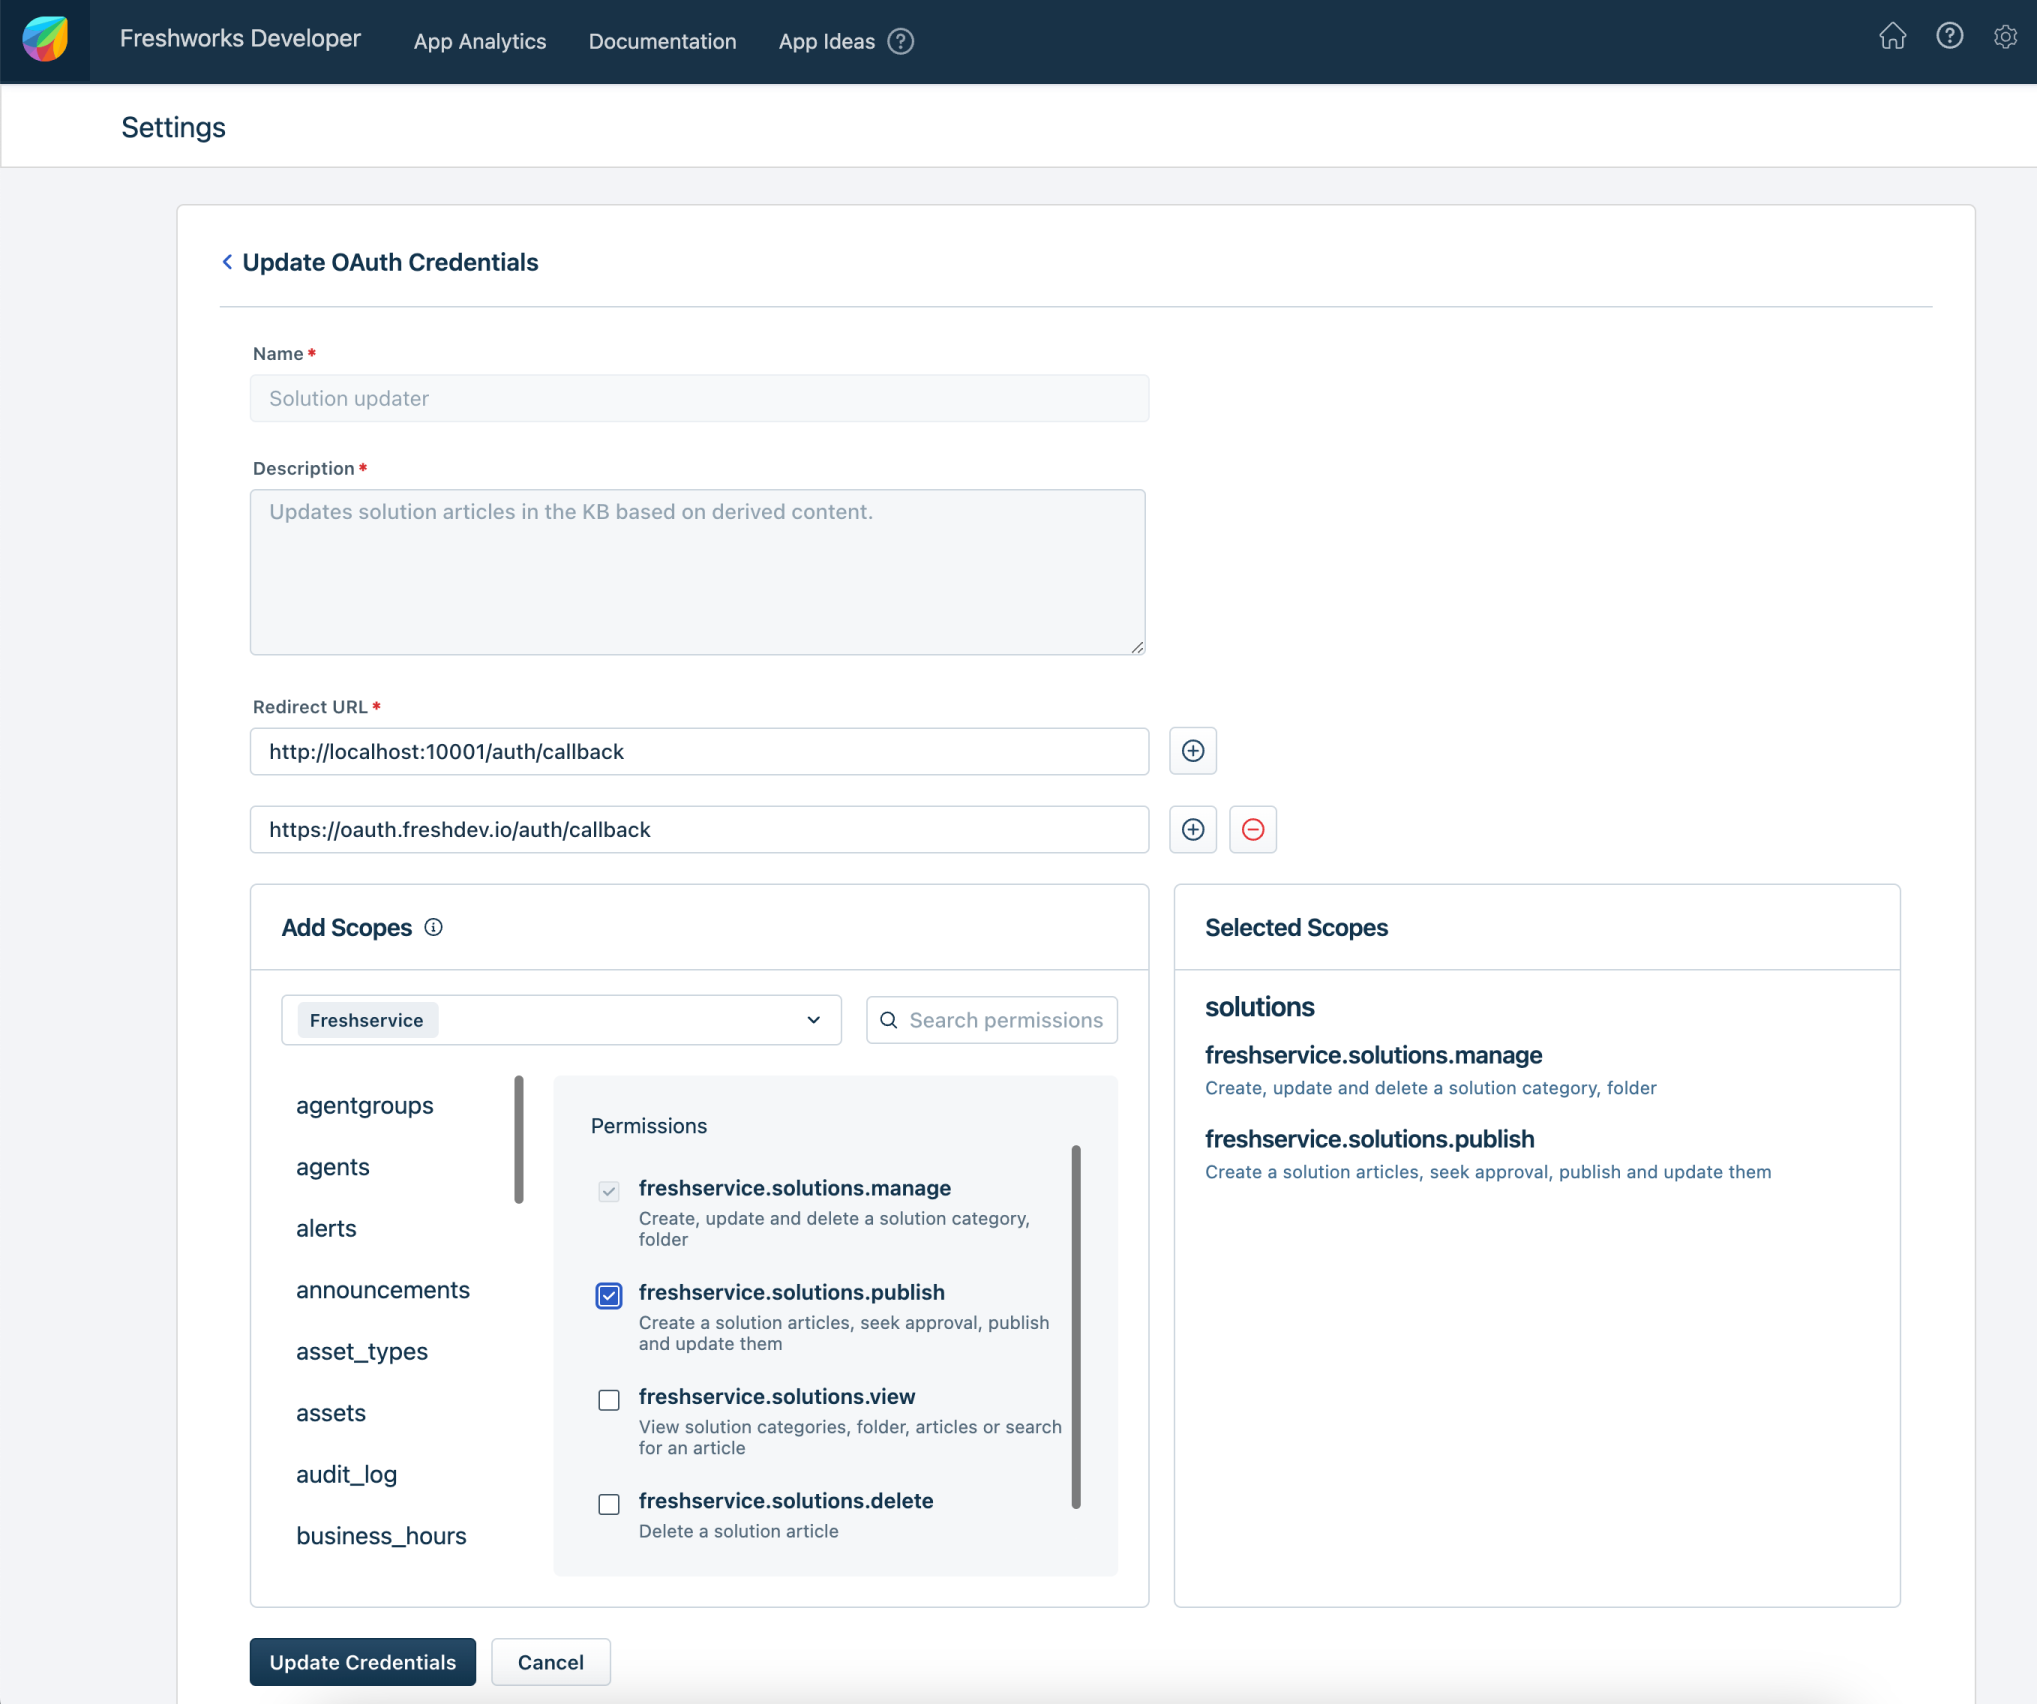 OAuth Credentials details page
Modify the appropriate values and click Update Credentials. The app’s credentials page is displayed. The prepopulated Client ID and the Client Secret fields are displayed. Use these values to configure the OAuth credentials JSON.
Note:While you can add new scopes, removing scopes that are already selected is not supported.
Set up the OAuth configuration file
Important:- For apps built using platform v3.0,
- We support multi-OAuth configurations. It means, during its lifecycle, an app can access multiple OAuth-secured resources. Currently, this feature lets your app access a maximum of three OAuth-secured resources.
- Out of the three OAuth configurations, only one can be a configuration that facilitates agent installation.
- For apps built using platform v3.1 and later,
- We support multi-OAuth configurations. It means that during its lifecycle an app can access multiple OAuth-secured resources. Currently, this feature lets your app access a maximum of five OAuth-secured resources.
- Out of the five OAuth configurations, only one can be a configuration that facilitates agent installation.
- Both account-level and agent-level authorization are supported. Set token_type to account or agent for each OAuth configuration.
- Along with multi-OAuth configurations, you can configure multiple accounts under a single OAuth-secured resource during app installation. For example, if you have multiple accounts or stores on Shopify, you can choose which specific account or store to use when placing the authorization request. Authorization with multiple accounts is supported only for account-level authorization.
- To enable your app to place an authorization request for a particular account, use the request method, define the $credentials.oauth method in the server.js file, and see the Test the OAuth flow section for testing the functionality. Agent-level OAuth cannot be used from the server.js file.
- The multi-account feature allows your app to access up to 20 accounts per OAuth-secured resource.
- From the app’s root directory, navigate to the config folder and create an oauth_config.json file (if oauth_config.json does not exist).
- In the oauth_config.json file, use the syntax on the right-pane to configure all OAuth configurations that the app is expected to use, as JSON objects.
On app installation,
- The developer platform constructs the authorization-code request based on the oauth_config.json file and places the request to the authorization server.
- After receiving the authorization code, the marketplace constructs the access-token request and places the request to the authorization server.
- Marketplace stores the received access token and refresh token.
Attributes of the OAUTH_CONFIG.JSON.integrations object
- <oauth_configuration_name>objectRequired
Meaningful identifier of the Freshworks product whose OAuth resource the app intends to access. This value is used at run-time to place the request method call.
Note:- For apps built on platform v3.0, you can configure a maximum of three <oauth_configuration_name> configurations.
- For apps built on platform v3.1 or later, you can configure a maximum of five <oauth_configuration_name> configurations. Both account-level and agent-level authorization are supported.
- display_namestringRequired
Freshworks product (whose resource the app is accessing) name that is displayed in the OAuth configuration and OAuth iparams page, when collecting requisite values from the app user.
- client_idstringRequired
Your app’s Client ID that is generated as part of the Create OAuth Credentials flow.
- client_secretstringRequired
Your app’s Client credential that is generated as part of the Create OAuth Credentials flow.
- authorize_urlstringRequired
Authorization URL to which your app must place the request for authorization grant. The syntax for the authorization URL is as follows:
https://<freshworks org domain name>/oauth/v2/authorize
For information on how to retrieve your <freshworks org domain name>, see How to find out my org URL?Important:Avoid hardcoding your Freshworks organization domain name for this attribute. If the organization domain name is hardcoded for this attribute and there is any change to the domain name, such as when an account is transferred to a different organization, the app users will face an error while authenticating the request. To resolve this, the app developer would have to release a new version of the app with the updated domain name in the code. To avoid this, it’s recommended to use the oauth_iparams object to capture the domain name for this attribute. For example, "authorize_url": "https://<%= oauth_iparams.domain%>/org/oauth/v2/authorize"
- token_urlstringRequired
URL to which your app must (use the authorization grant and) place the request for access token. The syntax for the token URL is as follows:
https://<freshworks org domain name>/oauth/v2/token
For information on how to retrieve your <freshworks org domain name>, see How to find out my org URL?Important:Avoid hardcoding your Freshworks organization domain name for this attribute. If the organization domain name is hardcoded for this attribute and there is any change to the domain name, such as when an account is transferred to a different organization, the app users will face an error while authenticating the request. To resolve this, the app developer would have to release a new version of the app with the updated domain name in the code. To avoid this, it’s recommended to use the oauth_iparams object to capture the domain name for this attribute. For example, "token_url": "https://<%= oauth_iparams.domain%>/org/oauth/v2/token"
- optionsobjectRequired
Additional parameters that the app should communicate, specified as key: value pairs.
- scopestringRequired
Level of access (to the Freshworks resources) that your app requires. You may include all or a subset of the scopes as selected in the OAuth credentials. Ensure that you do not include scopes that are not selected in your OAuth credentials
For example, for your OAuth credentials, consider that you have selected the following scopes:- freshservice.solutions.view
- freshsales.deals.view
- freshchat.conversation.view
Therefore, in this attribute, you can specify any or all of the defined scopes, separated by spaces.
Example"scope": "freshservice.solutions.view freshsales.deals.view freshchat.conversation.view" - customHeadersobjectRequired
Information pertaining to the custom headers to be sent in the request.
- AuthorizationstringRequired
Basic token used for authentication. The format of the token will be the base64 encoding of client_id:client_secret.
- token_typestringRequired
Specifies whether it is the app that is placing the OAuth request is installed at agent-level or account-level.
Possible values:- agent: Authorization handshake is initiated when an agent installs the app.
- account: Authorization handshake is initiated only when an admin installs the app.
- token_type cannot be agent for serverless or apps that run in the background.
- You can specify token_type as agent for only one OAuth configuration object.
Note:Only one oauth configuration can be a configuration that facilitates agent installation.
- oauth_iparamsobject
Installation parameters whose values need to be retrieved from the app user during installation, to complete the OAuth handshake.
Only parameters of type text are supported.
Use request method to place OAuth request
Provide a snapshot of the request to be made to the Freshworks org domain, in config/requests.json.
- Use the access_token variable in <requestTemplateName>.schema.header.Authorization.
- Set <requestTemplateName>.options.oauth to the <oauth_configuration_name> value defined in oauth_configs.json.
Sample config/requests.json{ "FreshserviceSolutionAccess": { "schema": { "method": "GET", "host": "sample-sub-domain.freshservice.com", "path": "/api/v2/solutions/categories", "headers": { "Authorization": "bearer <%= access_token %>", "Content-Type": "application/json" } }, "options": { "oauth": "freshworks" } } }Declare the configured template (snapshot) in manifest.json.
Sample manifest.json{ … "requests": { "FreshserviceSolutionAccess": {} } }Invoke the template from the app code in either app.js (for front-end app) or server.js (for serverless app).
Sample app.jsSample server.jstry { let workspace = await client.request.invokeTemplate( "FreshserviceSolutionAccess",{} ); //handle success } catch (err) { //handle error }
Define the credentials.oauth method in app code
Important:This section applies if you are building apps on platform version 3.1 or later. If you are building apps for platform version 3.0, skip this section and proceed to the Test the OAuth flow section.
The credentials.oauth method enables you to get the account name passed to the app during app installation. Within this method, define the oauthName key and assign it the name of the OAuth-secured resource as specified in the oauth_configs.json file of your app.
Important:Agent-level OAuth cannot be used from the server.js file. Use this method only for account-level OAuth configurations.
The version key specifies the payload version to be returned by the credentials.oauth method. Currently, the version key accepts v1 as its value.
const credentials = await $credentials.oauth({ version: 'v1' }).get({ oauthName: 'asana' });Handle token lifetime
The access token has a lifetime of 30 minutes. At a regular interval, the developer platform places a refresh-access-token call to the authorization server and regenerates the access token. When placing a refresh-access-token call, the refresh token is passed as a mandatory parameter. The refresh token has a lifetime of 365 days. After the refresh token expires, the access token is not updated and all REST API calls fail with a 401 - Unauthorized error.
To handle this,
For a front-end app that does not run in the background and is authorized at the agent level, whenever the REST API calls fail with a 401 error, a Reauthorize button should be displayed in the app interface. In your app logic, use the client.interface.trigger('reAuthorize') method to enable your app to display the Reauthorize button. Once the agent reauthorizes, i.e., logs in successfully, new access and refresh tokens are issued.
For a serverless app or an app installed at the account level, the app user (or the admin) should navigate to the App Gallery and reauthorize the app from the Settings page. Include intuitive error messaging in your app, to guide app users on the procedure to reauthorize the app.
ImportantWhen a user is deleted from an organization or removed from an account, the authorization server revokes any consents given to OAuth apps in that account and delete the refresh tokens issued to those apps. So, any subsequent API requests will fail.
Test the OAuth flow
Prerequisite: Create OAuth credentials specifying the local host URL as the Redirect URL(s).
From the command line, navigate to the directory that contains the app related files and run the fdk run command. The FDK starts the local test server.
To enter the OAuth configurations, navigate to http://localhost:10001/custom_configs. As a first step, the system settings page is displayed. All modules configured in the App manifest are listed.
In the system settings page,
Select the modules for which you want to test the OAuth app.
In the Organization Domain field, enter the domain value from the organization URL for the account. Note:The org_domain attribute will only be retrieved as a part of currentHost object in app installation page and app settings page.
In the Enter account URL section, enter valid account URL(s) for the product(s) to which the selected modules belong.
If your app manifest includes the service_ticket or service_user modules and you select either of them, the Select Freshservice Product Type section will appear.
In this section, choose the appropriate product type: ITSM or MSP.
NoteIf your app manifest does not include the service_ticket or service_user modules, or if you have not selected either of them, the Select Freshservice Product Type section will not be displayed.
Click Continue.
The OAuth configurations page is displayed prompting for client ID and client Secret. Enter appropriate values and click Submit.
Notes:For agent-level installations (oauth_config.json.intergrations.oauth_configuration_name.token_type is agent) the OAuth configurations page is not displayed.
If there are multiple OAuth configurations, the configuration page for each OAuth is displayed based on the order in which the configurations are defined in oauth_config.json.
If you have configured OAuth iparams, the configuration settings page is displayed. Enter appropriate values and click Save & Continue.
Note: If there are multiple OAuth configurations and if the configurations contain OAuth iparams, the configuration settings page for each OAuth is displayed based on the order in which the configurations are defined in oauth_config.json.
If you have configured installation parameters for the app, the App Settings page is displayed at http://localhost:10001/custom_configs. Enter appropriate values for the installation parameters and click Install.
For front-end apps that do not run in the background,
Log in to the Freshworks product account where you want to test the app deployment.
To the default account URL displayed in the address bar, append ?dev=true.
Example URL: https://subdomain.freshdesk.com/helpdesk/tickets/1?dev=true.
Navigate to the appropriate location where the app is intended to be deployed, verify that the app is rendered. On the app’s front-end an Authorize button is displayed.
Click Authorize, to enable the app to perform OAuth handshake.
For serverless apps and apps that run in the background, you can publish the app as a Custom app, navigate to the App Management Portal and Configure or Authorize your app.
After a successful handshake, the generated token is stored in:
- The .fdk/localstore file when token_type is account.
- The browser's localStorage when token_type is agent.
Publish your app
After end-to-end local testing (of all app features), verify that at least one production URL is specified as your app’s Redirect URL(s).
If required, modify your app code to use the latest OAuth credentials.
Important:The mapping between OAuth apps and OAuth credentials is 1-1. A configured OAuth credential can only be used with one app. If an app using the OAuth credential is published to the Marketplace, in the App Management Portal an error is displayed if you try to upload another app with the same credentials (in the oauth_config.json file).